

How to Stream Switch on Discord: 5 Easy Steps for Switch & Switch 2
To stream a Nintendo Switch on Discord, connect the dock to a capture card, connect the card to your computer, open the captured gameplay in a preview app, and share that app window in Discord. If you searched "how to stream my Switch on Discord," the five numbered stages below provide the complete beginner workflow. They also show how to stream Switch games on Discord with both game sound and microphone audio.
In this guide
What You Need to Stream Switch on Discord
The Switch sends its picture through the HDMI port on the dock. A capture card converts that HDMI signal into a USB video source that your computer can display and Discord can share.
- A dockable Nintendo console: Nintendo Switch, Switch OLED, or Switch 2.
- The matching powered dock: Use a Switch dock for Switch or Switch OLED, and a Switch 2 dock for Switch 2.
- An HDMI capture card: It needs HDMI IN and a USB connection. A model with HDMI OUT is preferable because it lets you play on a TV without preview delay.
- One or two HDMI cables: One connects the dock to the capture card. A second connects the card to a TV or monitor when using HDMI passthrough.
- A Windows PC or Mac: Install Discord and either the capture card's preview software or OBS Studio.
- A microphone or headset: Use this for your voice. Game audio arrives separately through HDMI.
Important: Nintendo Switch Lite cannot use this method because it does not support TV mode or HDMI video output. A normal USB-to-HDMI adapter does not add video output to a Switch Lite.
A laptop's HDMI port is usually an output for sending the laptop picture to a monitor. It is not an input for receiving the Switch picture. This is why the capture card is required.
Step 1: Connect the Switch and Capture Card
Turn off the Switch before connecting everything. Place the dock, capture card, computer, and optional TV close enough that the cables are not stretched.
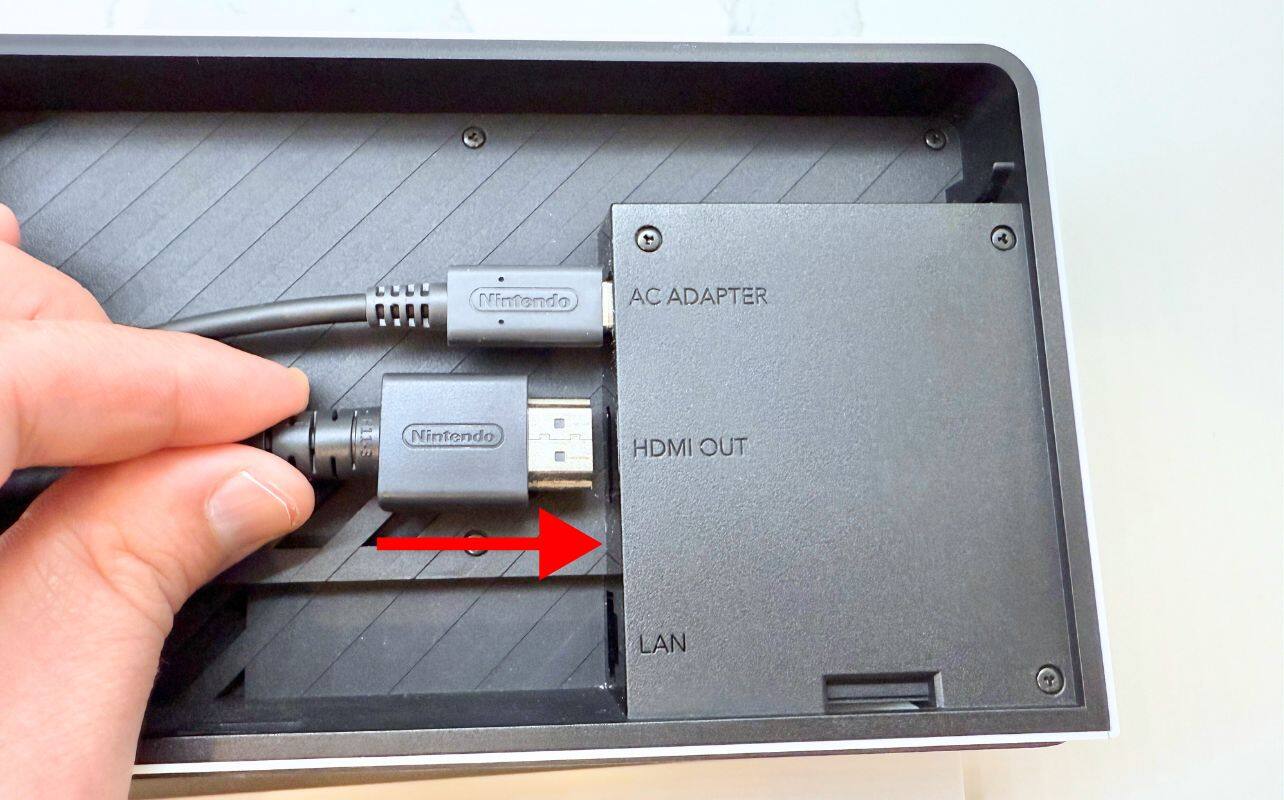
- Connect power to the dock. Open the rear cover and plug the console's AC adapter into the dock. A dock without power may charge the console slowly but fail to send a stable HDMI picture.
- Connect the dock to the capture card. Plug one end of an HDMI cable into HDMI OUT on the dock. Plug the other end into HDMI IN on the capture card.
3. Connect the capture card to the computer. Use the supplied USB cable. Connect it directly to a USB 3 port when possible instead of an unpowered hub.
4. Connect the optional passthrough display. If the capture card has HDMI OUT, connect that port to a TV or monitor with the second HDMI cable.
5. Dock the console. Remove any protective case that prevents the console from sitting fully in the dock, then insert the Switch.
6. Turn on the TV and Switch. Select the HDMI input connected to the capture card. The Switch home screen should appear on the TV.
The completed signal path is:
Switch dock HDMI OUT → capture card HDMI IN → capture card USB → computer
For passthrough, add: capture card HDMI OUT → TV or monitor
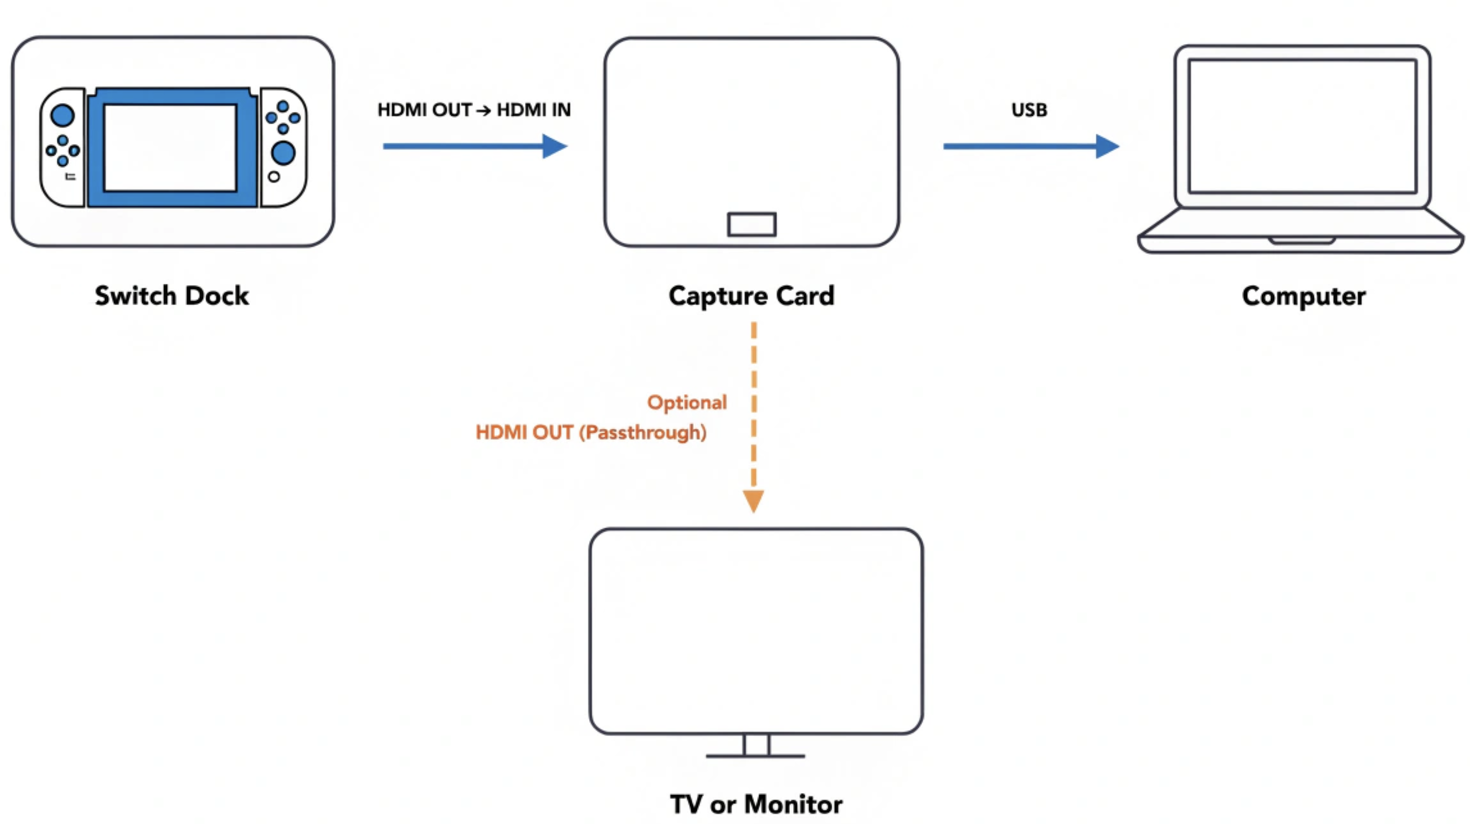
Play from the passthrough TV when possible. A preview window on the computer may add noticeable controller delay, while HDMI passthrough sends the game directly to the display.
Step 2: Set the Switch Video and Audio Output
Start with settings that almost every modern capture card can read. Higher output settings are useful only after the basic connection works.
- Open System Settings from the Switch home screen.
- Scroll down and select TV Settings.
- Set TV Resolution to 1080p. If the capture app later shows a black screen, temporarily use 720p.
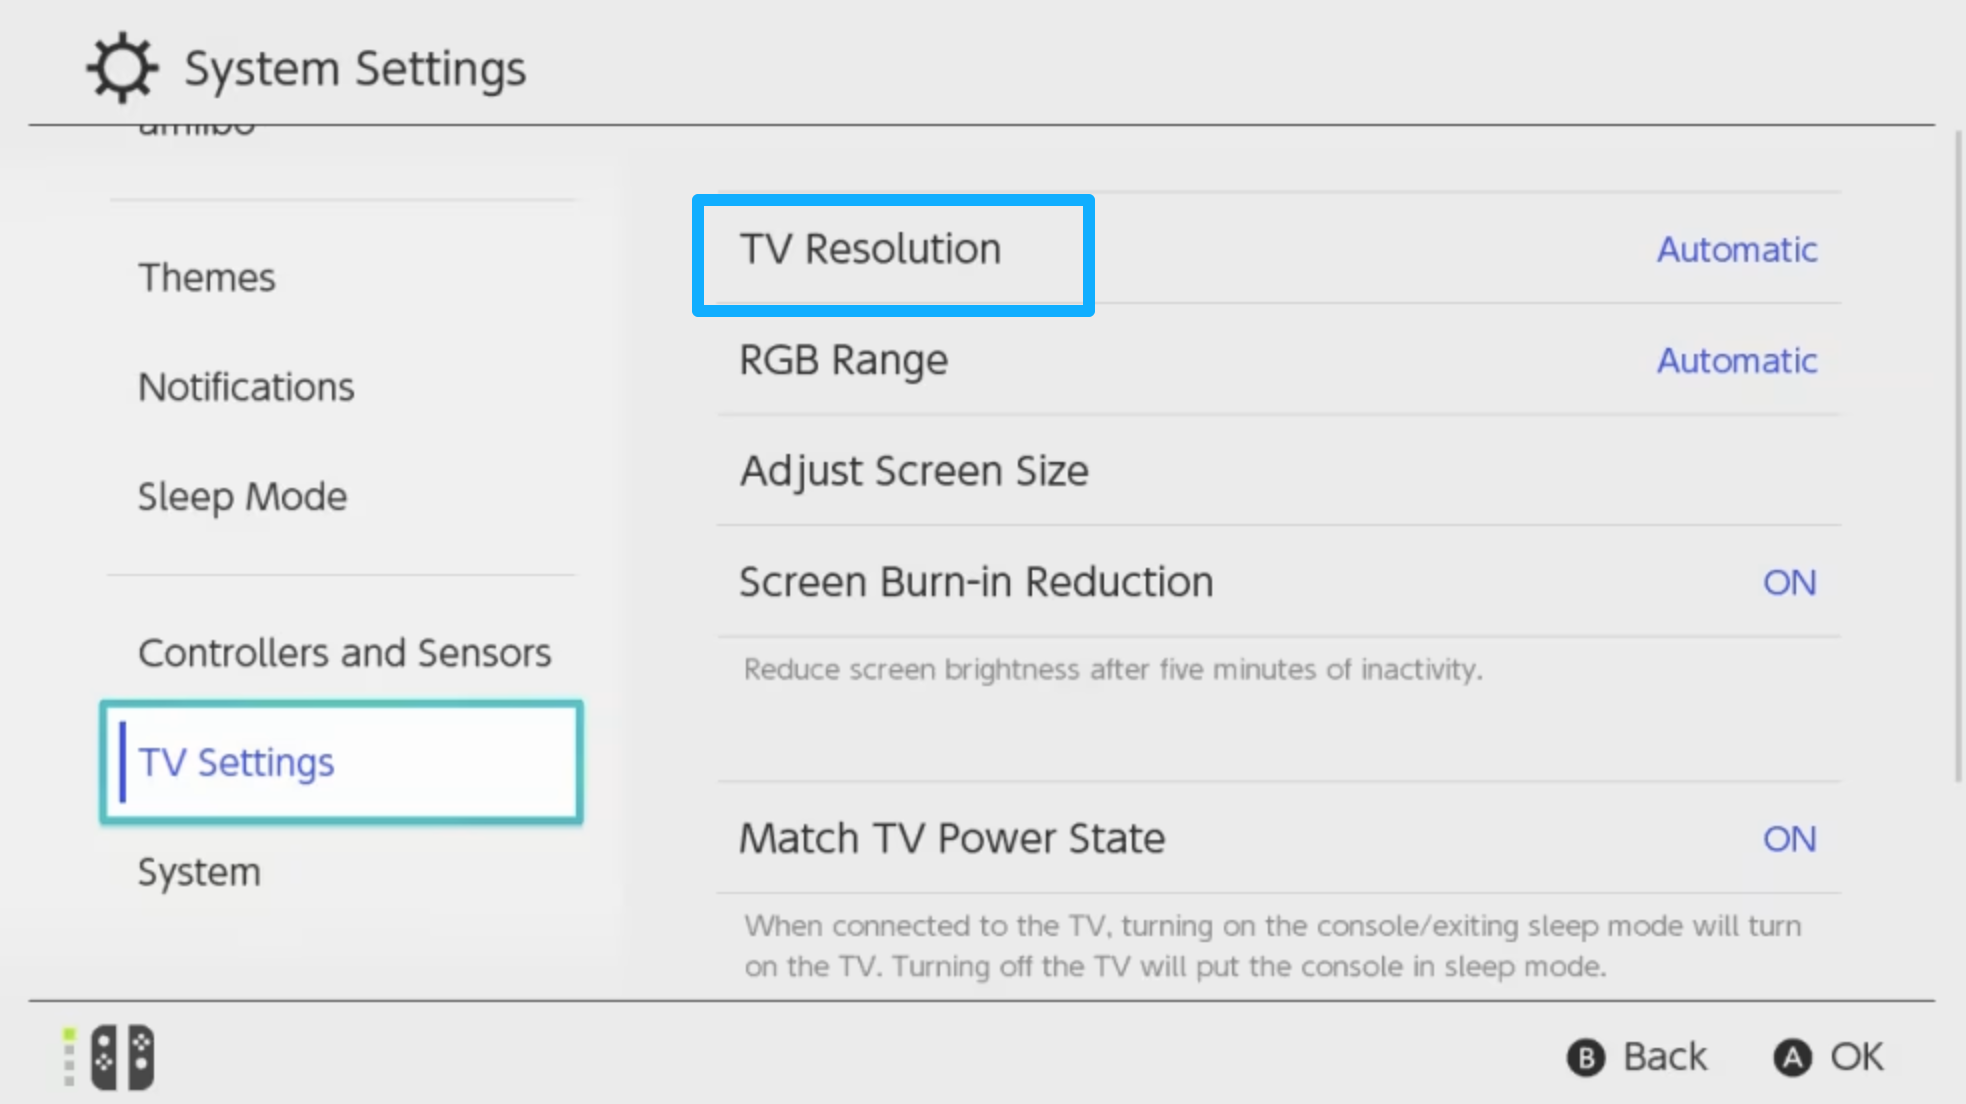
4. Set RGB Range to Automatic. Change it only if the picture looks washed out or unusually dark.
5. Set TV Sound to Stereo. Stereo is the most reliable format for inexpensive capture cards and Discord.
6. Return to the home screen and launch the game you want to share.
Unplug wired headphones from the Switch itself. When headphones occupy the console's audio jack, game sound may stop traveling through HDMI. Connect the headset to the computer, TV, monitor, or an audio interface instead.
Step 3: Open the Switch Gameplay on Your Computer
You now need a normal computer window that displays the captured game. Discord will share this window with your friends.
Option A: Use the Capture Card's Preview App
This is the easiest option for a simple Discord watch party. Install and open the software supplied by the capture card manufacturer, then follow these steps:
- Open the app's device or input menu.
- Select the capture card. It may appear under its product name or as USB Video.
- Choose 1920 × 1080 and 60 fps if supported. Use 30 fps when the computer or internet connection struggles.
- Turn on preview audio or speaker monitoring so game sound plays through the computer.
- Move the app into a normal window. Do not minimize it.
- Play for 20 seconds and confirm that the picture moves smoothly and the sound is synchronized.
This method keeps the setup simple: the same application window produces the picture and game sound that Discord needs to share. For anyone learning how to stream Nintendo Switch on Discord for the first time, this is the best place to start.
Option B: Use OBS Studio
Use OBS when you want to add a facecam, overlay, custom layout, or local recording. After installing OBS Studio:
- Open OBS and create a new scene named Switch.
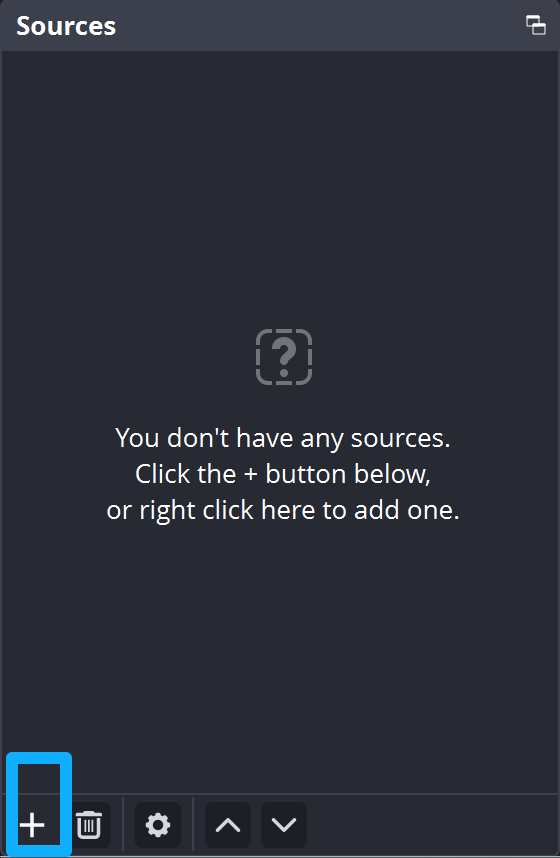
- In the Sources panel, click the + button.
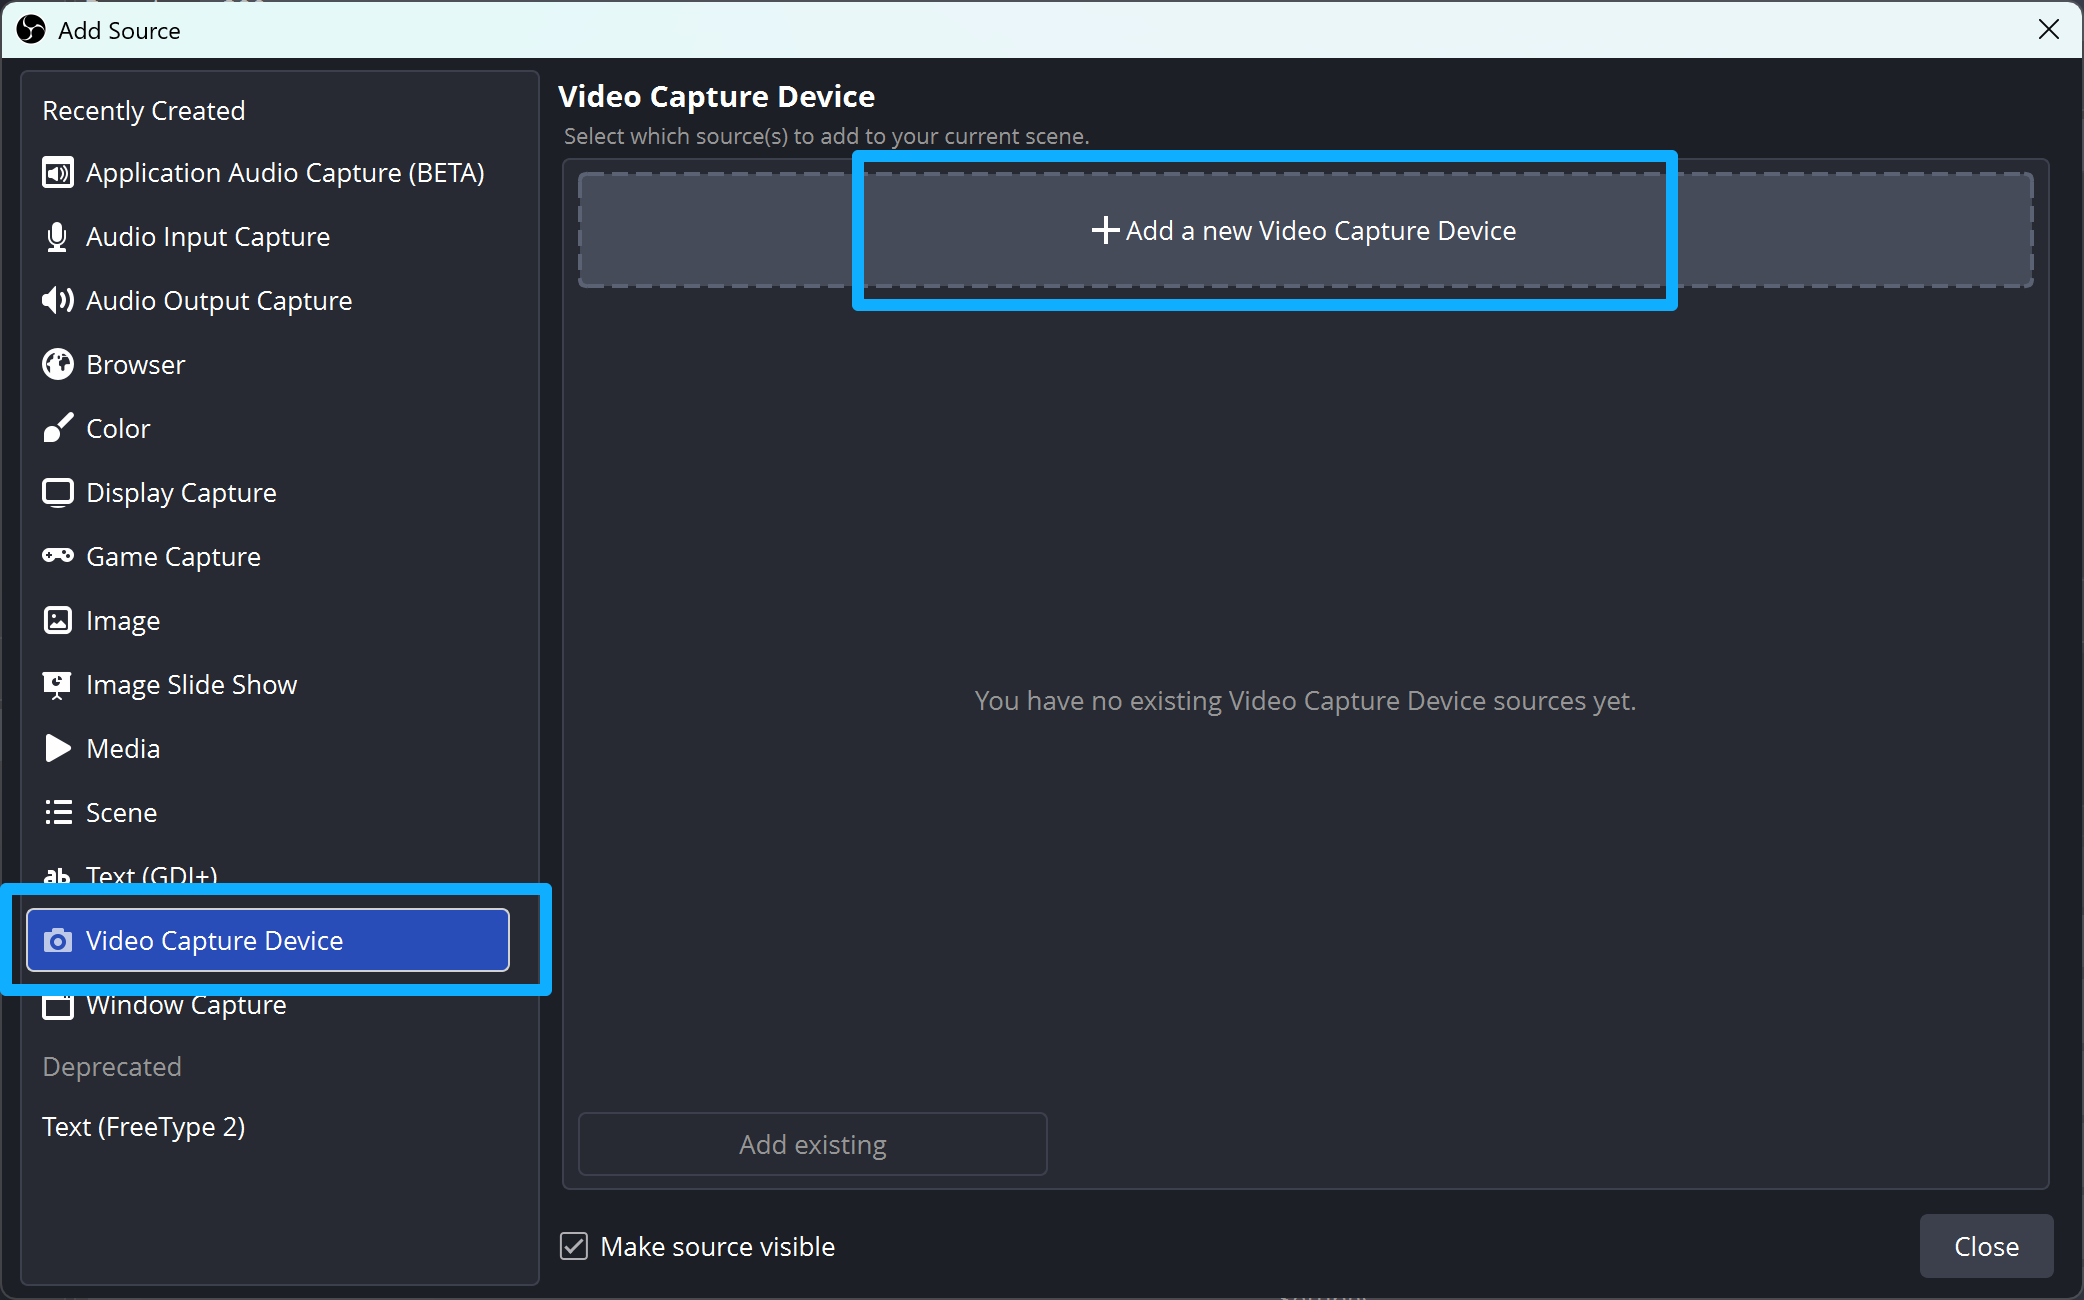
3. Select Video Capture Device.
4. Choose Create New, name it Switch Capture, and click OK.
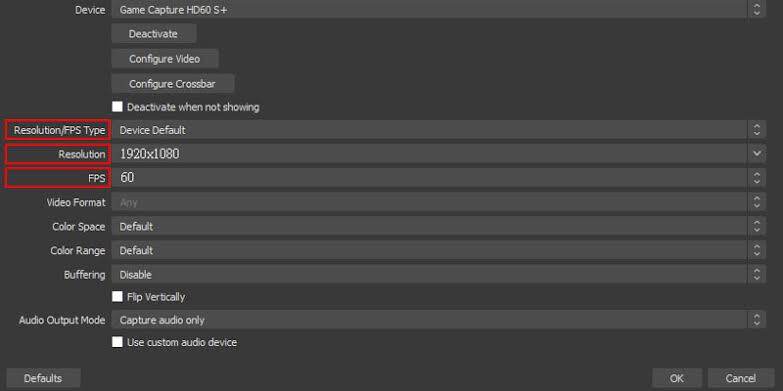
5. Open the Device menu and choose the capture card.
6. Leave Resolution/FPS Type on Device Default first. If the image is cropped or unstable, choose Custom, then set 1920 × 1080 and 60 or 30 fps.
7. Click OK. Drag the red handles around the source until the game fills the canvas.
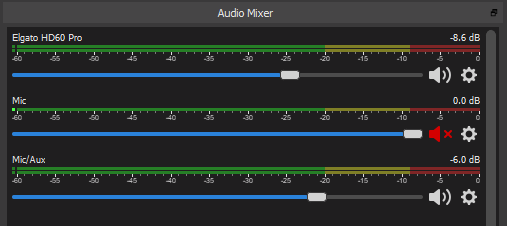
8. Look at the Audio Mixer. The capture source meter should move when the game makes sound.
If the video appears but the mixer stays still, open the capture source's Properties, enable Use custom audio device, and select the capture card. On a Mac, you may need to add Audio Input Capture as a separate source and select the card there.
For a clean window, right-click the OBS preview and select Windowed Projector (Preview). Discord can share that projector without showing the OBS controls. This OBS streaming guide covers the main OBS controls if you are setting it up for the first time.
Optional: Add a Tracked Facecam with OBSBOT Tail 2
Once the Switch appears in OBS, you can add a separate camera source for your reactions. OBSBOT Tail 2 is useful when you want more than a fixed webcam—for example, when you stand during motion games, move between a gaming desk and demonstration area, or record a polished version for YouTube while streaming to friends on Discord. Add Tail 2 as another video source in OBS and place it above the gameplay as a picture-in-picture facecam.
Three features that fit this workflow:
- AI Tracking 2.0 with Auto Zoom: Tail 2 can follow the selected player and adjust between close-up, half-body, and full-body framing, helping the facecam stay useful when you leave the chair or move around the room.
- Up to 4K at 60 fps: The high-resolution camera feed gives OBS more room to crop or resize the facecam and preserves a cleaner local recording, even when the final Discord stream uses a lower resolution.
- Flexible computer and production connections: USB 3.0 provides the simplest path into a computer, while HDMI, SDI, and Ethernet support more advanced capture-card, switcher, or network setups.
Step 4: Share the Switch Window in Discord
Keep the capture preview or OBS projector open before launching the Discord stream. Discord needs to see the window in its application list.
Stream in a Server Voice Channel
- Open the Discord desktop app.
- Select the server where your friends are waiting.
- Click a voice channel to join it.
- Click the Screen button in the voice-status panel near the lower-left corner.
- Open the Applications tab.
- Select the capture preview app or the OBS projector window. Share the application rather than the entire desktop so notifications and unrelated windows stay private.
- Choose the stream resolution and frame rate. Start with 720p at 30 fps for stability. Use 1080p or 60 fps when your Discord plan, upload speed, and computer support it.
- Make sure application audio is enabled in the share dialog.
- Click Go Live.
- Ask one friend to watch for 20 seconds and confirm picture, game sound, and your microphone.
Stream in a Direct Message
- Open the direct message or group message.
- Start a voice or video call.
- Click Share Your Screen.
- Select the capture preview or OBS projector window.
- Choose the stream quality and click Go Live.
Best starting quality: Use 720p/30 fps when the stream is choppy. For games with fast movement, prioritize 60 fps over a higher resolution once the connection is stable.
Step 5: Set Up Game and Microphone Audio
The game and your voice follow different routes. Game audio travels from the Switch through HDMI and the capture card. Your voice enters Discord through the microphone selected under User Settings → Voice & Video.
If You Use the Capture Card App
- Make sure the app's game-audio meter moves.
- Enable audio playback or monitoring inside the app.
- Share the app as an application window in Discord with sound enabled.
- In Discord, keep your headset microphone selected as the input device.
- Use headphones so the game sound does not leave the speakers and re-enter the microphone as an echo.
If You Use OBS
First, right-click the OBS Audio Mixer and open Advanced Audio Properties. Find Switch Capture and set Audio Monitoring to Monitor and Output. You should now hear the game through the computer.
Share the OBS projector and test it with a friend. If the picture works but Discord still does not receive game sound, use this reliable route:
- Install a virtual audio device such as VB-Cable on Windows or BlackHole on macOS.
- In OBS, open Settings → Audio and select the virtual cable as the Monitoring Device.
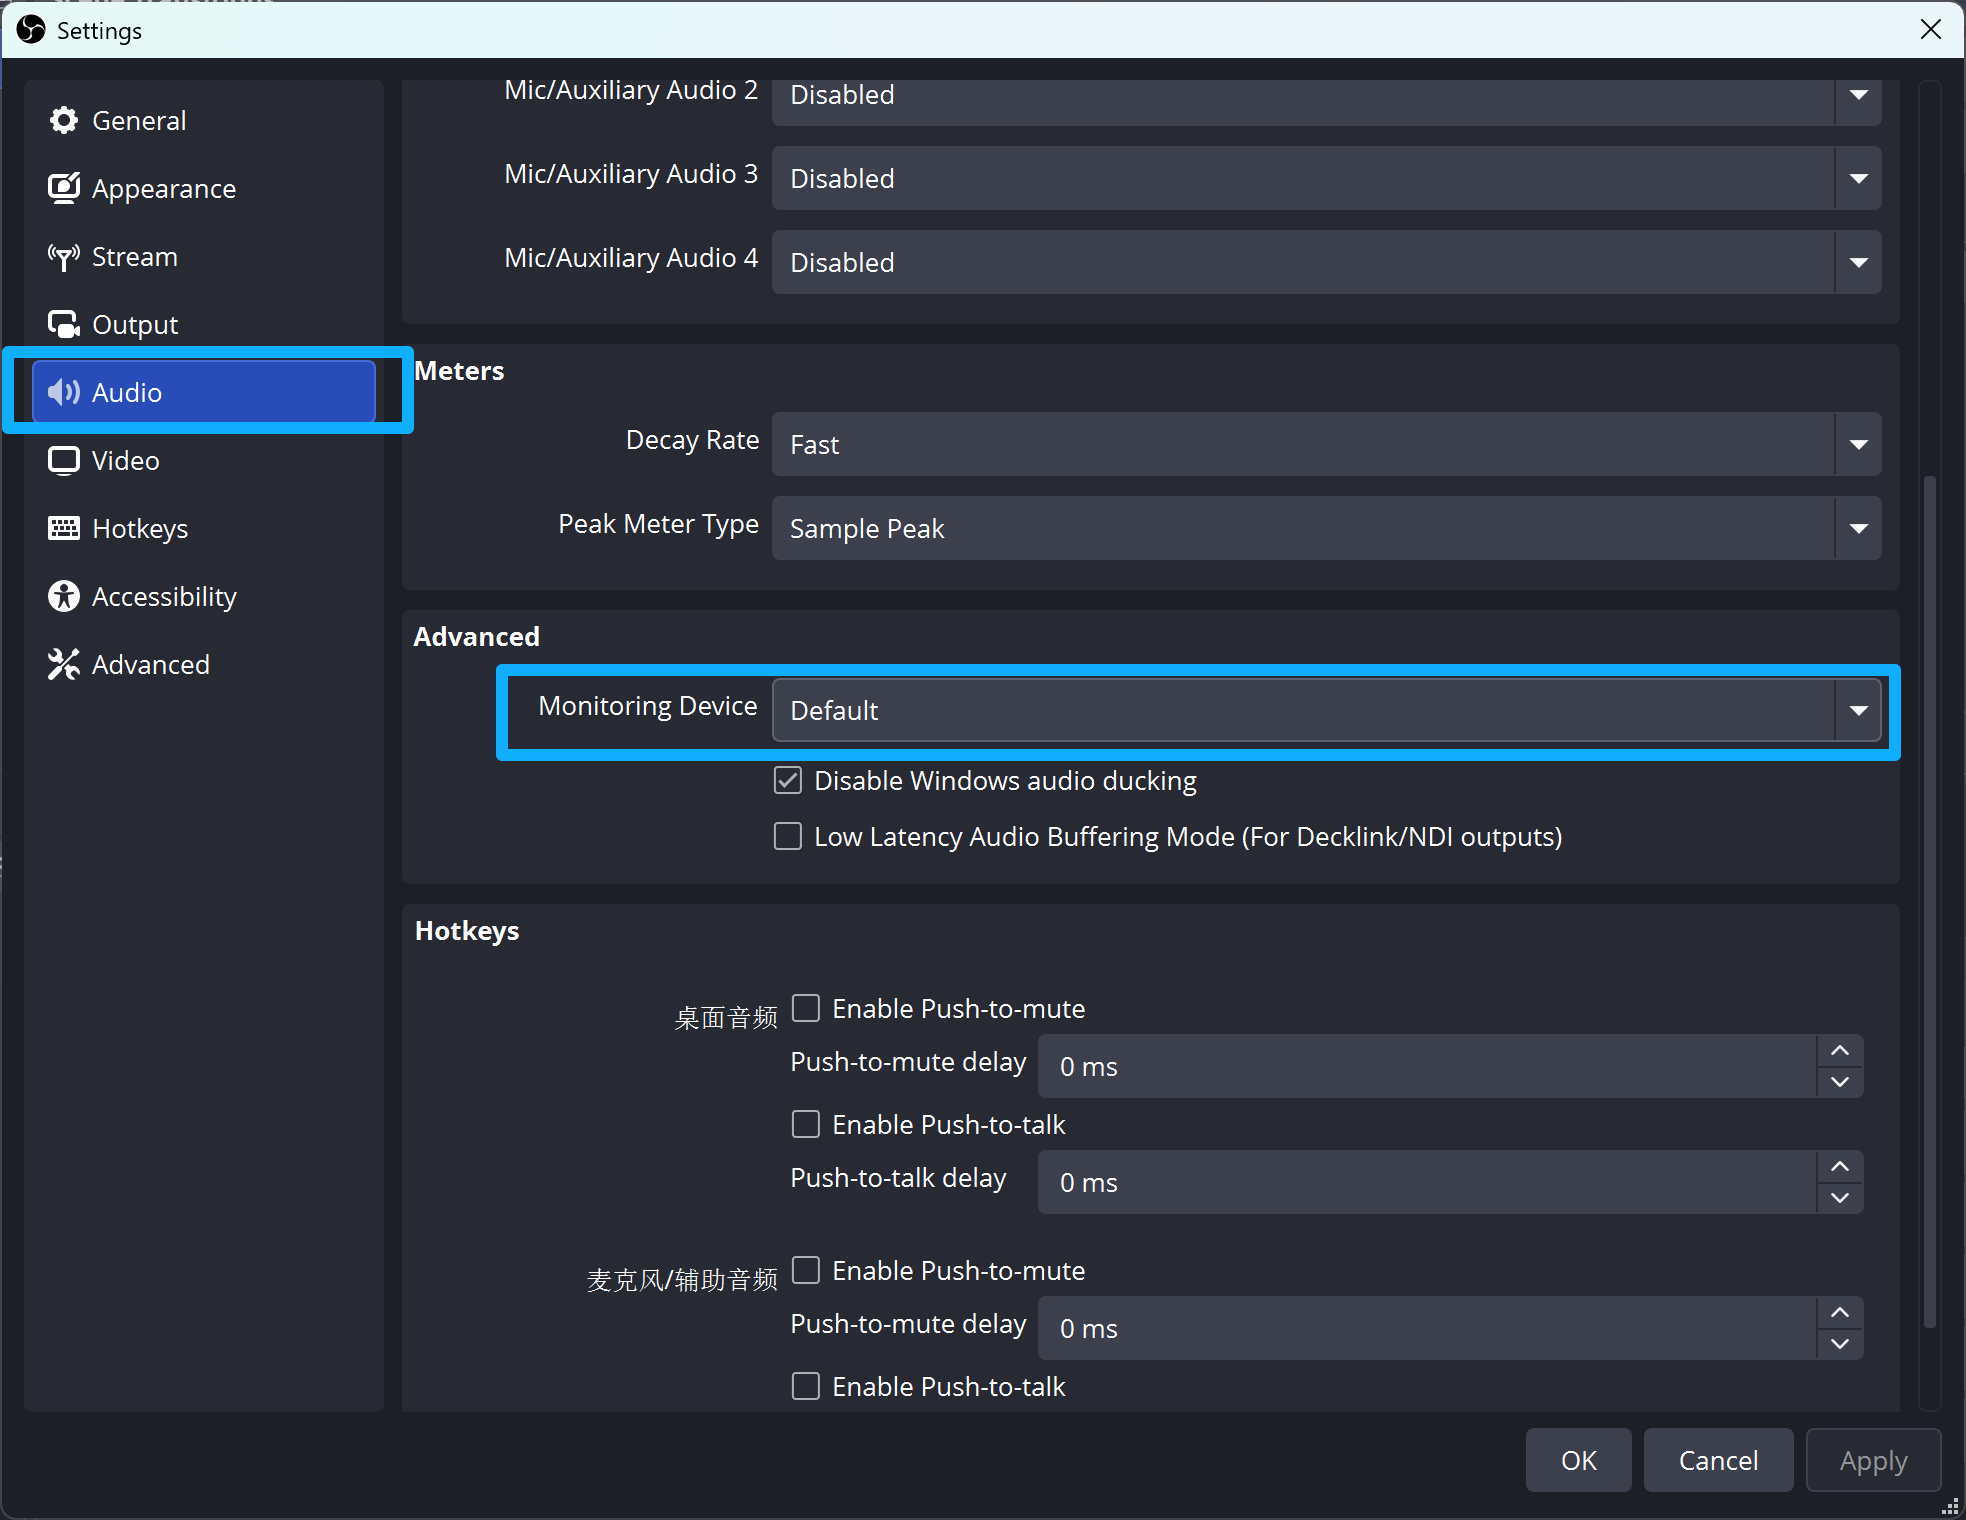
3. Add your microphone to OBS as an Audio Input Capture source.
4. In Advanced Audio Properties, set both the Switch capture audio and microphone to Monitor and Output.
5. In Discord's Voice & Video settings, choose the receiving side of the virtual cable as the input device.
6. Run Discord's microphone test. It should now contain both your voice and the game.
Do not monitor the same source through both the capture app and OBS. Two active monitoring paths create doubled sound or echo.
How to Stream Switch 2 on Discord
The Discord and capture-software steps are the same for Switch 2. The hardware and video-output settings need a little more attention.
- Use the Switch 2 dock and its power adapter. The original Switch dock does not fit the Switch 2.
- Connect the Switch 2 dock's HDMI output to the capture card's HDMI input.
- Start at 1080p/60 fps. Although Switch 2 supports higher HDMI output modes, the capture card must also support the selected resolution, refresh rate, and HDR signal.
- If the capture preview is black, set the console output to 1080p, turn HDR off, and disable 120 Hz output. Test each higher setting individually after the picture works.
- Use a capture card with 4K passthrough if you want to play on a 4K display while sending a lower-resolution stream to Discord.
Learning how to stream Switch 2 on Discord comes down to the same signal path: capture the dock's HDMI output on a computer, then share the resulting application window. Switch 2's built-in communication features do not send gameplay to a Discord call.
Fix Common Switch-to-Discord Problems
| Problem | What to do |
|---|---|
| No picture anywhere | Power the dock, reseat the console, and verify that the cable runs from dock HDMI OUT to capture-card HDMI IN. Test the dock directly on a TV before adding the capture card. |
| Picture on TV but not computer | Reconnect the capture card's USB cable, try a direct USB 3 port, close other apps using the card, and select the correct device in the preview app or OBS. |
| Black screen from Switch 2 | Set output to 1080p/60, turn off HDR and 120 Hz, then reopen the capture source. The previous output mode was outside the card's supported input range. |
| Video works but game sound is missing | Set TV Sound to Stereo, unplug headphones from the console, and confirm the capture-card audio meter moves before changing Discord settings. |
| Friends hear your voice but not the game | Share the capture application with audio enabled. For an OBS projector, monitor the capture audio through a virtual audio device and select that device as Discord's input. |
| Echo or doubled game sound | Keep only one monitoring path active. Mute the capture app if OBS is monitoring the card, and use headphones instead of speakers. |
| Controller feels delayed | Play from the TV connected to HDMI passthrough. Do not use the computer preview as the gameplay display. |
| Discord stream stutters | Lower Discord to 720p/30, connect the computer by Ethernet, stop cloud uploads, and close other recording or streaming applications. |
| Capture window is missing from Discord | Open the preview before the share menu, keep it unminimized, and restart Discord if the application list does not refresh. |
FAQs About Streaming Switch on Discord
Can I stream my Switch to Discord without a capture card?
You cannot send clean live gameplay directly from a docked Switch to Discord without capture hardware. The free workaround is to point a phone camera at the Switch or TV during a Discord video call, but the image, sound, and viewing angle will be noticeably worse.
Is Nintendo Switch compatible with Discord?
Yes, through a computer and capture card. Discord runs on the computer, receives the capture preview as an application window, and sends that window to the voice channel or call.
Can I screen share Nintendo Switch on Discord mobile?
The Discord mobile app can share the phone's own screen, but it cannot directly read the HDMI signal from a Switch. Without a compatible mobile capture device, the practical mobile-only method is to use the phone camera to show the console or TV.
Do I need OBS to stream Switch games on Discord?
No. The capture card's preview app is easier for a basic stream. OBS becomes useful when you want a facecam, overlays, scene layouts, local recording, or more control over audio.
Can I use a cheap capture card?
Yes, if it accepts the dock's HDMI signal and works as a USB video device on your computer. Budget cards often lack HDMI passthrough, deliver 1080p at only 30 fps, or introduce more preview delay. Check the supported input and capture formats rather than relying on "4K" in the product name.
Can Nintendo Switch Lite use a capture card?
No standard capture-card setup works because Switch Lite has no TV mode and does not output gameplay video through USB-C. Recording the physical screen with a separate camera is the available live option.
Conclusion
The complete setup is dock HDMI OUT → capture card HDMI IN → USB to the computer → preview app or OBS → Discord screen share. Build and test each link in that order. Once the preview has stable video and audio, Discord becomes the easy final step. Use HDMI passthrough for responsive gameplay and begin at 1080p capture with a 720p/30 Discord stream before increasing quality.














