How to Stream with OBS Studio
Whether you want to share gameplay, teach a lesson, or present on camera, OBS Studio can combine your picture and sound into one live broadcast. The first setup involves three jobs: building the layout viewers will see, connecting a streaming platform, and checking that everything works.
This guide walks through those jobs in order. Complete the basic setup, then follow the instructions for YouTube, Twitch, TikTok, Kick, or Facebook Live.
What You Need to Stream with OBS
Use your existing equipment for the first test. You can begin with a laptop webcam and a headset microphone.
- Computer: Install OBS Studio from the official OBS website. If buying a computer for camera and screen streaming, 16 GB of RAM is a practical starting target. Streaming a game on the same computer also requires enough CPU and GPU capacity for that game.
- Camera: Use a built-in or USB webcam if you want to appear on screen. A screen-only broadcast does not require one.
- Microphone and headphones: Connect a headset or USB microphone. Use headphones to keep playback sound from entering your microphone.
- Internet connection: Use Ethernet when available and pause cloud backups or large uploads.
- Platform account: Confirm that your account has live-streaming access. YouTube's first-time activation can take up to 24 hours.
A USB webcam connects directly to your computer. An HDMI camera or game console generally requires a capture card between the device and the computer.
Set Up Your Camera, Screen, and Microphone
1. Create Your Main Scene
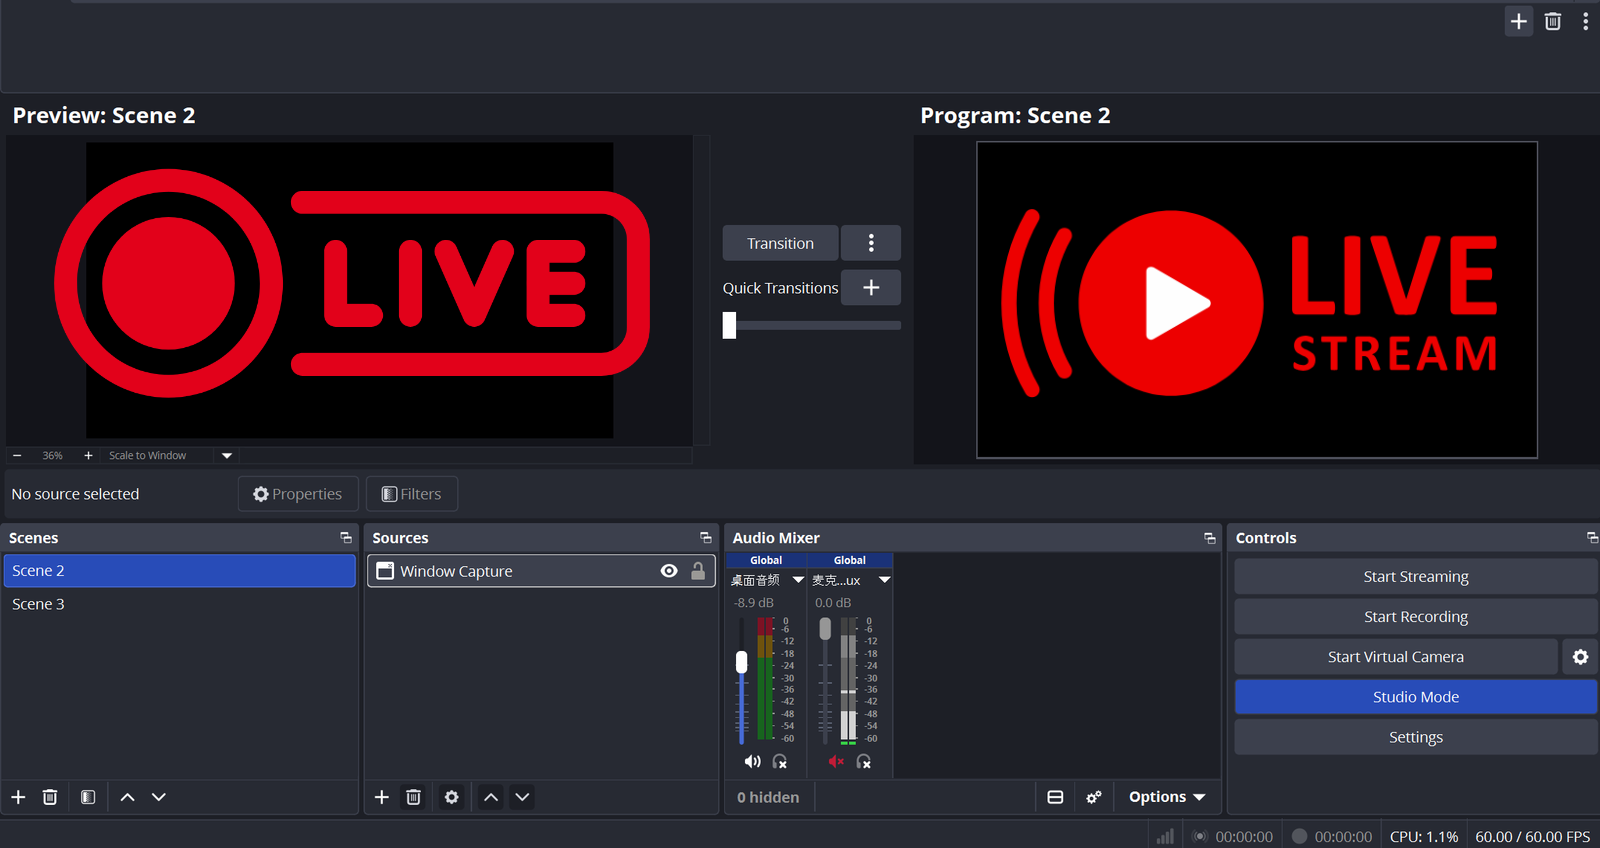
A scene is a layout. Each camera, application window, or image inside it is a source.
- Open OBS. Close the Auto-Configuration Wizard for now if it appears.
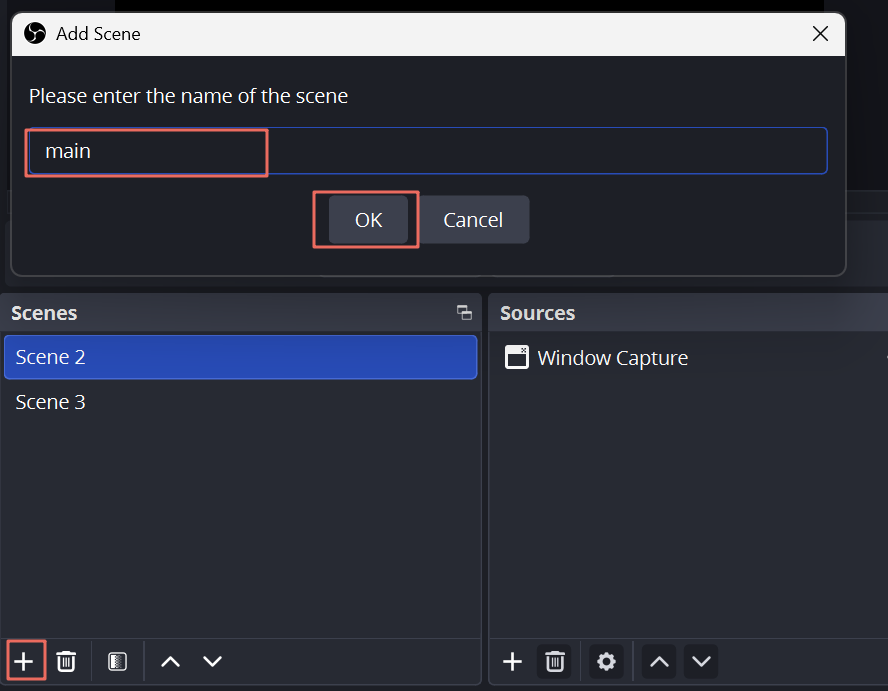
- In the Scenes panel, click +.
- Name the scene “Main” and click OK.
2. Add Your Webcam/Camera
Skip this step for a screen-only broadcast.
- Connect the camera and close other applications using it.
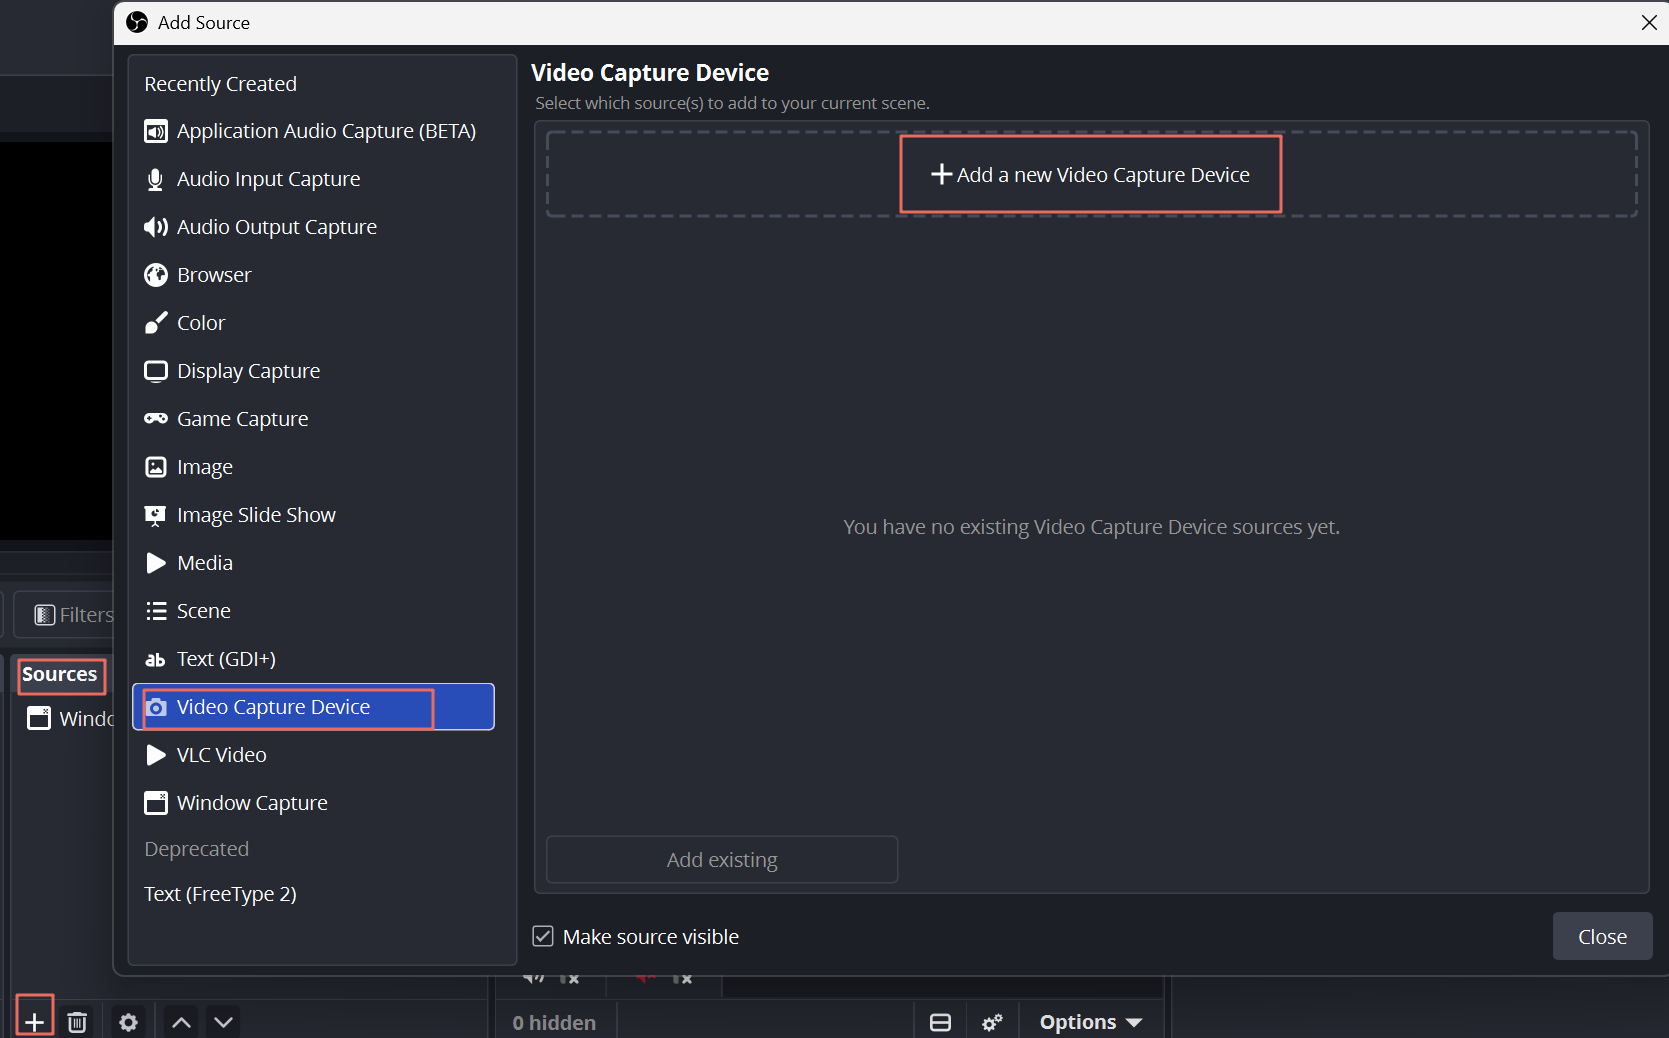
- In Sources, click + > Video Capture Device.
- Name the source “Camera” and click OK.
- Select your camera from the Device list. If using a capture card, select that device instead.
- When the picture appears, click OK.
- Right-click the picture and choose Transform > Fit to Screen.
Best USB Tracking Webcam for OBS Streaming
When you stream a lesson, explain a project, or switch between gameplay and a face-camera scene, the camera should fit the same straightforward setup as the rest of your equipment.
The OBSBOT Tiny 3 Lite suits this desktop workflow. It connects by USB and adds motorized tracking for presenters who shift position or stand beside their desk while speaking.
Key Features
- Direct USB connection: Add Tiny 3 Lite as a Video Capture Device in OBS without an HDMI capture card. This keeps a first-time camera setup to one connection and one source selection.
- AI Tracking 2.0: The camera pans and tilts to follow your movement during a standing explanation or desk-side demonstration. For a seated gaming stream, keep a fixed frame when you want the face-camera overlay to remain steady.
- 4K at 30 FPS: Capture a detailed camera source for full-screen presentations or local recordings. Your OBS broadcast can still use 720p or 1080p to match the stream settings.
- Built-in microphone system: Start a spoken presentation without a separate microphone. If you already use a headset or USB microphone, select that input in OBS and mute the webcam microphone to avoid doubled audio.
- OBSBOT Center controls: Adjust framing and image settings before opening your broadcast. Check the result in the OBS preview so the camera looks consistent with your scene.
3. Add Your Screen or Game
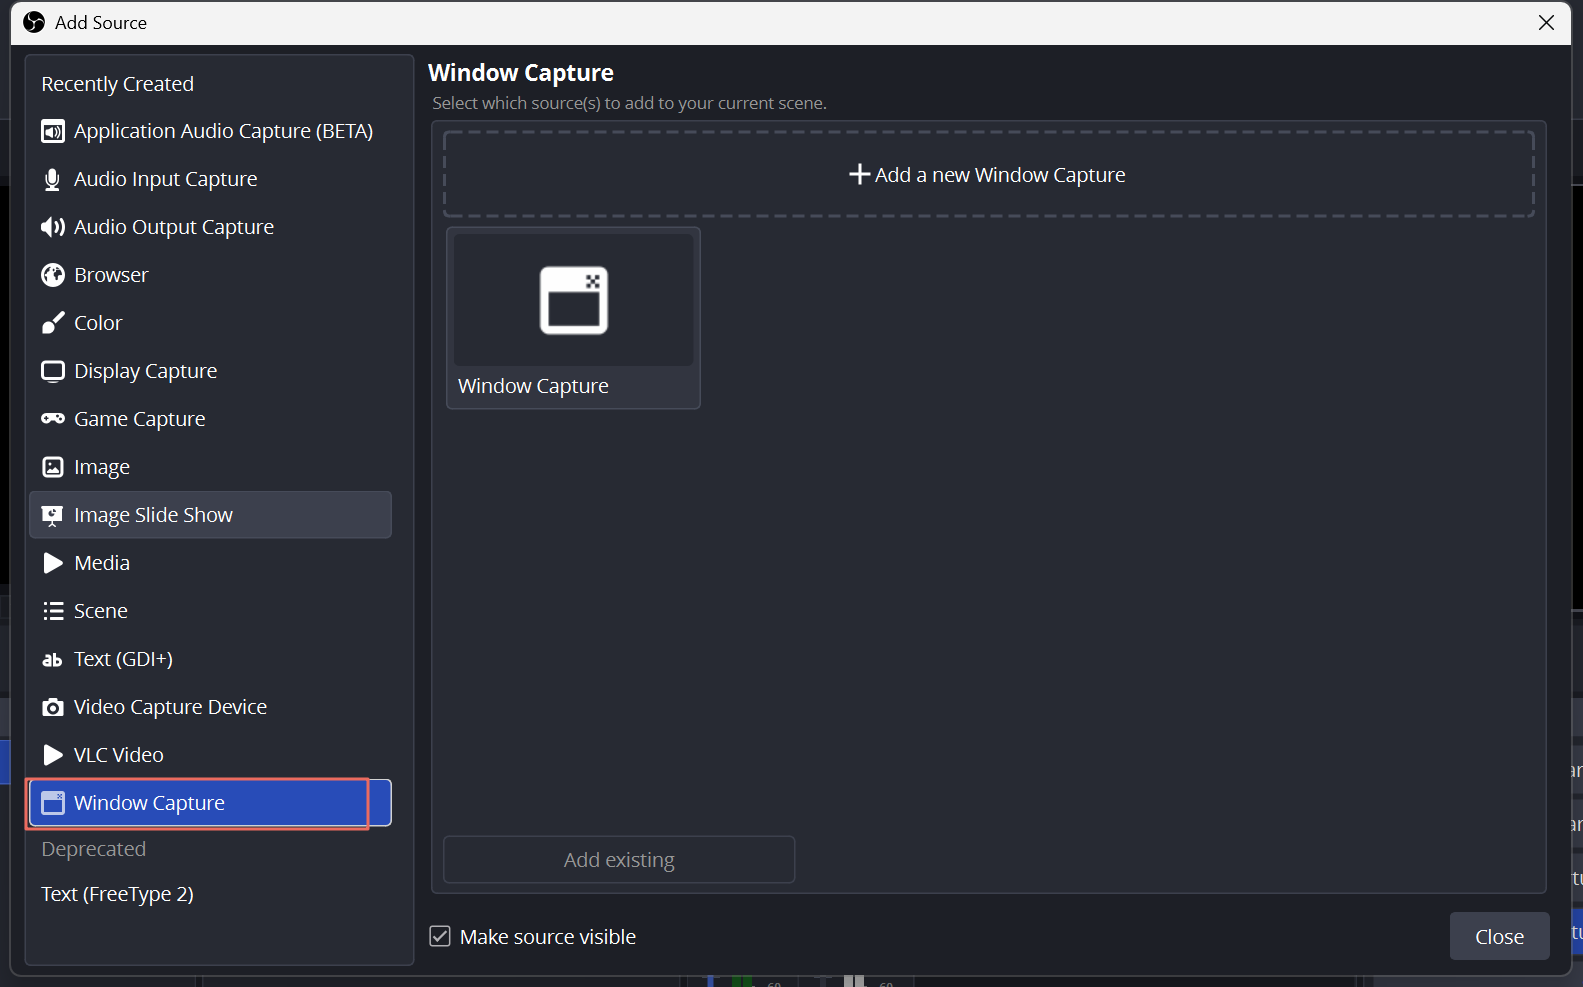
Skip this step for a camera-only broadcast. Otherwise, open the application or game, then click Sources > + and choose:
- Window Capture on Windows: Select the application window you want to share.
- Game Capture on Windows: Choose “Capture specific window” and select the running game.
- macOS Screen Capture on Mac: Select the application, window, or display. Grant screen recording permission when prompted.
Click OK. Right-click the new picture and select Transform > Fit to Screen.
To show your face over the screen, drag Camera above the screen source in the Sources list. Select the camera picture, drag a corner inward to shrink it, and move it into position. Lock the sources when the layout is finished.
4. Select Your Microphone
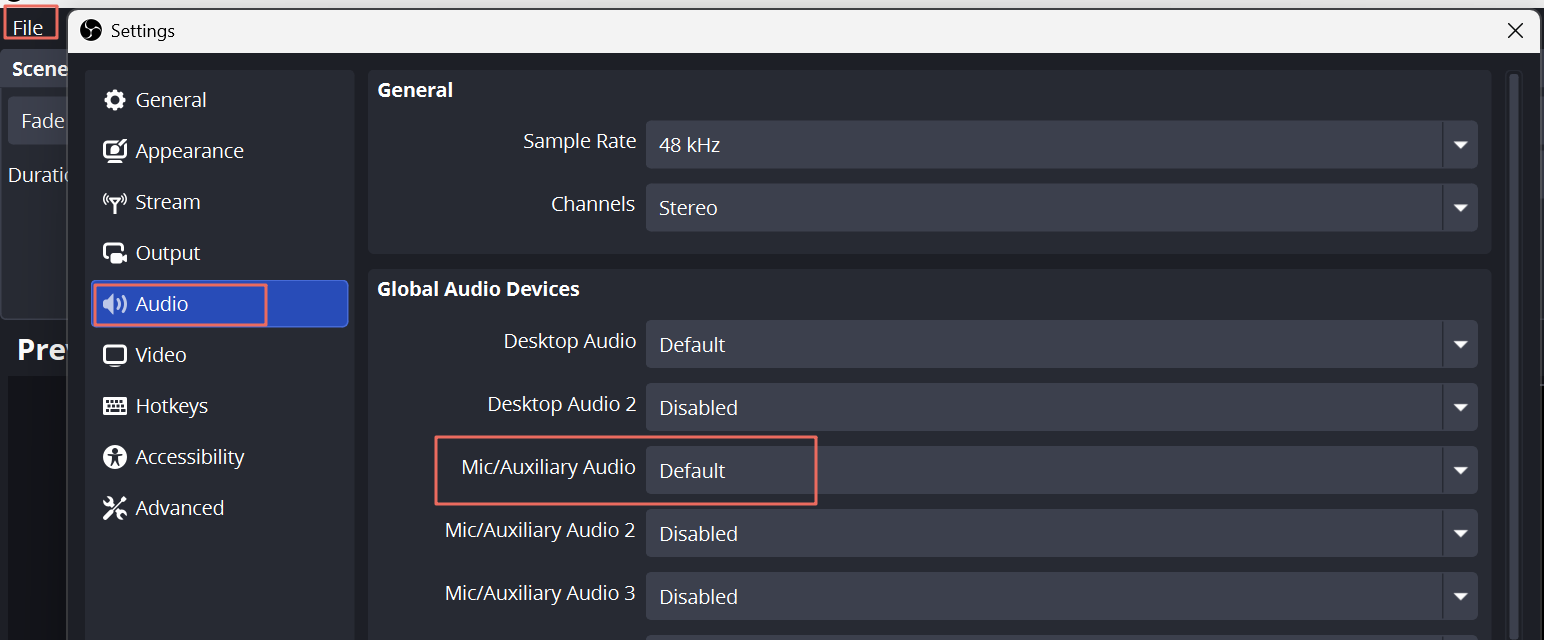
- Open File > Settings > Audio.
- Under Mic/Auxiliary Audio, select your microphone by name. Click Apply, then OK.
- Speak and watch its meter in the Audio Mixer.
- Adjust the slider so louder words peak around -12 to -6 dB, without reaching 0 dB.
- Mute any unused camera microphone so your voice is captured only once.
If viewers need game or application sound, select your playback device under Desktop Audio on Windows. On a supported Mac, capture the application audio through macOS Screen Capture or a macOS Audio Capture source. Play a sound and confirm that its mixer meter moves.
5. Record a One-Minute Check
- Click Start Recording.
- Speak, move on camera, and use the application or game you plan to show.
- Click Stop Recording after one minute.
- Open File > Show Recordings and play the file with headphones.
Check that the picture is correct, your voice is clear, and the application sound is audible when needed. Fix missing picture or sound before connecting to viewers.
Connect Your Platform and Start Streaming
Choose one platform below. Each section includes the connection, settings, and broadcast controls for that destination. Keep stream keys private because they authorize broadcasting to your account.
Stream with OBS on YouTube
- Create a test broadcast: Open YouTube Studio > Create > Go live. Open the Stream section, enter the broadcast details, and choose Private visibility. Turn off auto-start.
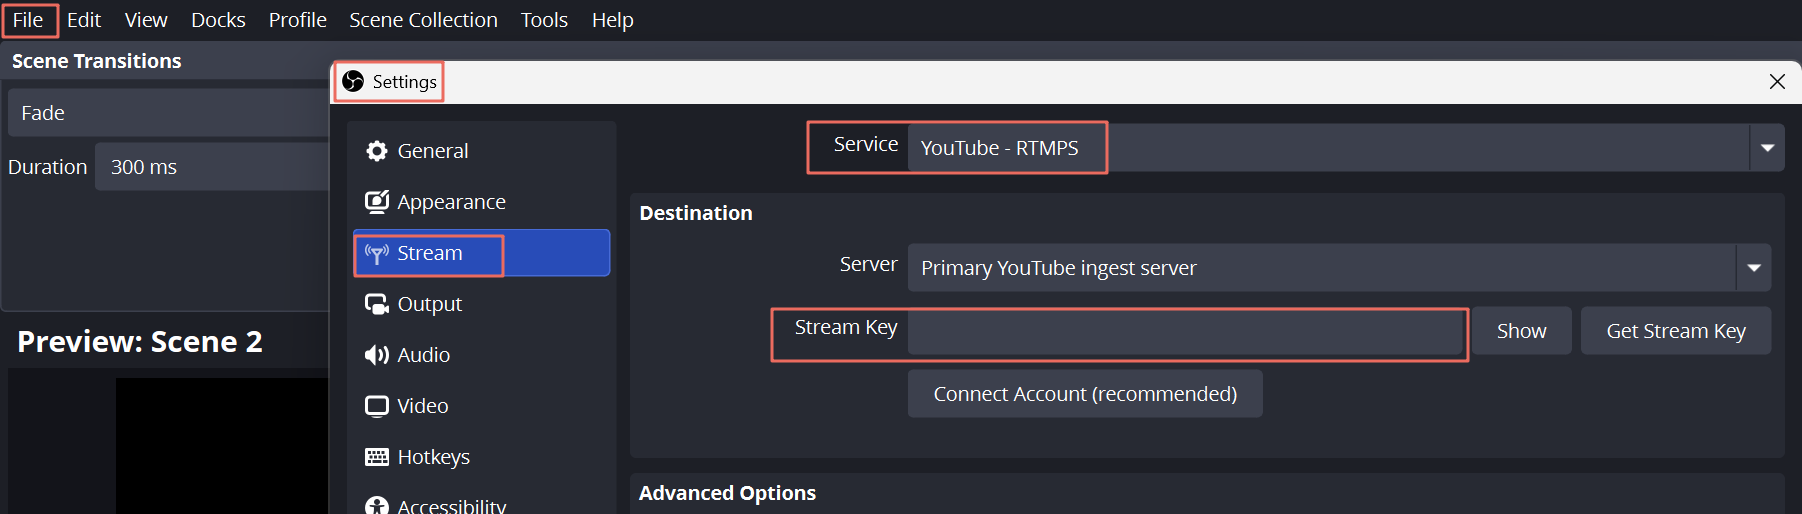
- Connect OBS: Copy the stream key. In OBS, open Settings > Stream, select the YouTube RTMPS service, choose the stream-key option, and paste the key. Click Apply.
- Configure output: Open Tools > Auto-Configuration Wizard. Choose “Optimize for streaming,” select 30 FPS, confirm the YouTube connection, and run the bandwidth test when offered. Click Apply Settings.
- Check the incoming feed: Click Start Streaming in OBS. Return to YouTube Studio and wait for your picture to appear. Check the stream health messages.
- Run the private test: Click Go live in YouTube Studio. Use your actual content for approximately 10 minutes and check the playback. Keep playback muted on the streaming computer to avoid echo.
- Start the public broadcast: End the private broadcast and stop streaming in OBS. Create or select your public broadcast, confirm its stream key in OBS, start sending video, then click Go live in YouTube Studio.
When finished, end the broadcast in YouTube Studio and click Stop Streaming in OBS.
Stream with OBS on Twitch
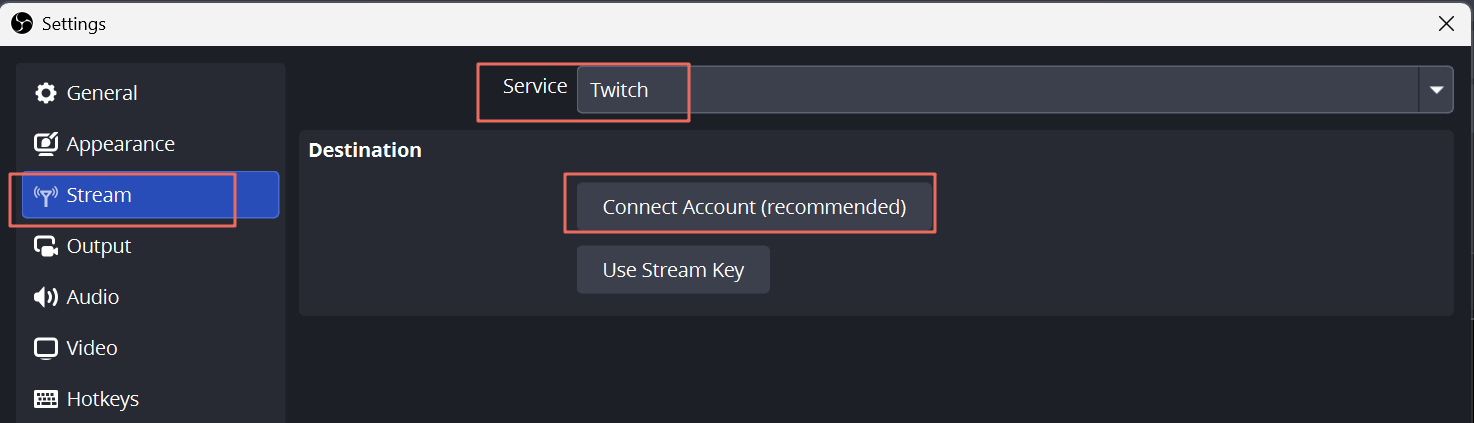
- Connect your account: Open OBS Settings > Stream, select Twitch, and click Connect Account. Sign in and authorize OBS. Leave the server on Auto.
- Configure output: Open Tools > Auto-Configuration Wizard. Choose streaming, select 30 FPS, confirm Twitch, run the connection test when offered, and apply the results.
- Prepare the broadcast: Open Twitch Creator Dashboard and set the title and category.
- Test without a normal public broadcast: Enable Bandwidth Test Mode in OBS's Twitch settings when available. Click Start Streaming and open Twitch Inspector to review the connection.
- Start publicly: Stop the test, disable Bandwidth Test Mode, and click Start Streaming again when ready. Open your channel page to confirm that the broadcast is live.
If you use a manual stream-key connection, Twitch's bandwidth test can instead be enabled by appending ?bandwidthtest=true to the key. Remove the suffix before the public broadcast.
Stream with OBS on TikTok LIVE
TikTok's available desktop tools depend on your account. First, check whether your LIVE setup displays a server URL and stream key. Mobile LIVE permission alone does not guarantee access to them.
If your account provides a stream key:
- Open the streaming-software option available in your TikTok LIVE setup and copy the server URL and stream key.
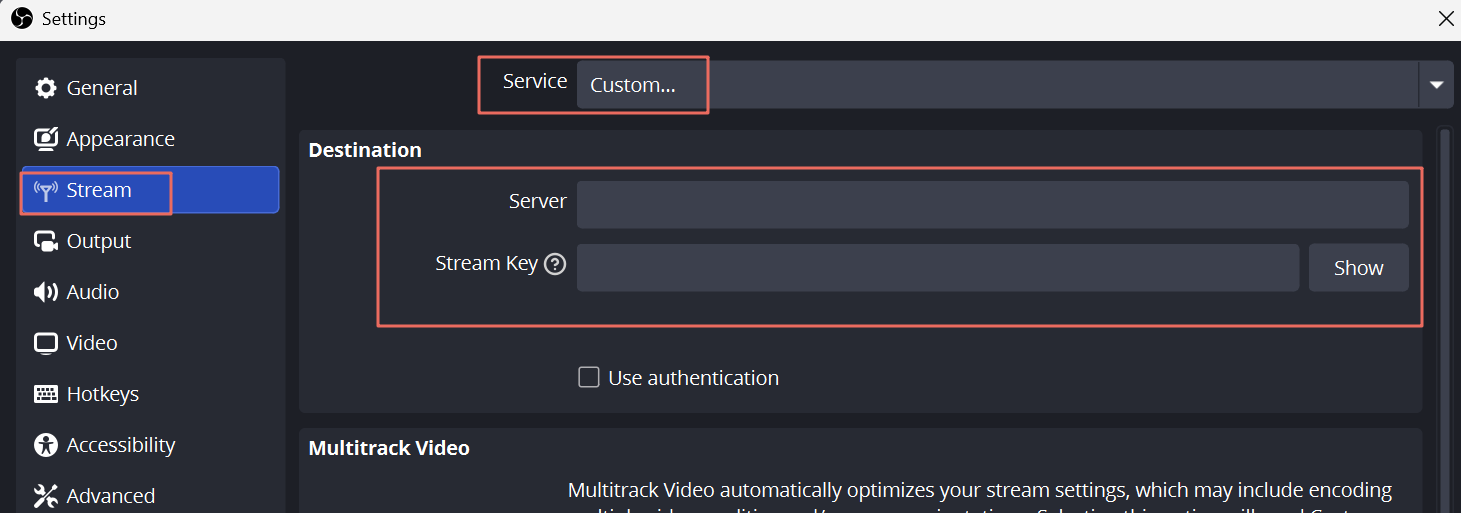
- In OBS, open Settings > Stream and select Custom. Paste the URL into Server and the key into Stream Key. Click Apply.
- For a vertical broadcast, open Settings > Video. Set the canvas to 1080 × 1920 and use the output resolution and frame rate specified in your TikTok setup.
- In Settings > Output, enter the encoder and bitrate settings displayed by TikTok for that connection.
- Return to the OBS preview and resize the sources to fit the vertical frame. Record a short sample to check that faces and text are not cut off.
- When ready, click Start Streaming. Check the incoming feed and complete any publishing confirmation shown in TikTok's dashboard. Treat the stream as potentially public unless the dashboard explicitly identifies a test mode.
If you do not have a stream key, OBS cannot create one. Use an approved desktop LIVE route available to your account. Eligible TikTok Shop creators can use OBS Virtual Camera through LIVE Manager:
- In OBS, select your finished scene and click Start Virtual Camera.
- Open TikTok Shop for Creators > LIVE Manager and prepare your shopping session, including at least one product.
- Choose OBS Virtual Camera as the video input and select your microphone separately. The virtual camera does not carry OBS audio.
- Use Practice Mode to check the picture and sound, then select Go LIVE when ready.
The LIVE Manager route applies to eligible TikTok Shop creators, not every TikTok account. With this route, TikTok handles broadcasting; do not also click Start Streaming in OBS.
Stream with OBS on Kick
- Find the connection details: Open Kick Creator Dashboard > Channel > Stream URL and Key.
- Connect OBS: In Settings > Stream, select Custom. Paste the server URL and stream key, then click Apply.
- Set a starting output: In Settings > Video, select 1280 × 720 output and 30 FPS. In Settings > Output, use H.264, CBR, 3,000 Kbps, and a two-second keyframe interval. This is a starting test profile, not a maximum-quality preset. On Mac, Kick's guide specifies x264 for CBR; use the veryfast preset.
- Set the broadcast details: In Kick's dashboard, click Edit Stream Info, enter a title and category, and save.
- Go live: After checking your local recording, click Start Streaming in OBS. This begins a public broadcast. Open your channel to check playback.
- Finish: Click Stop Streaming and confirm that your channel shows offline.
Stream with OBS on Facebook Live
- Open the broadcast setup: Open Facebook Live Producer, select the eligible profile or Page, and create a live broadcast.
- Select the video source: Choose Streaming software. Copy the server URL and stream key shown in the setup panel.
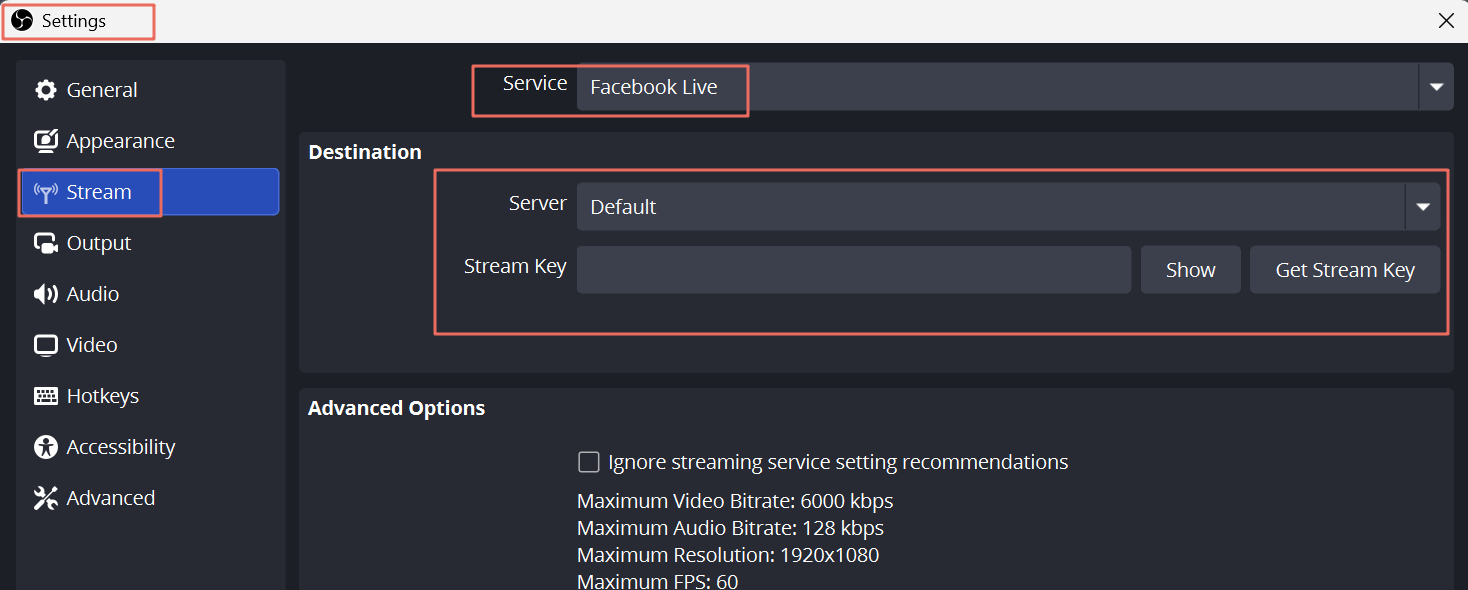
- Connect OBS: Open Settings > Stream, select Custom, and paste the URL and key into their matching fields. Click Apply.
- Configure output: Enter the encoder settings shown in Live Producer. For an initial 720p30 test, H.264 video, CBR at 4,000 Kbps, a two-second keyframe interval, and AAC audio are a practical starting profile unless the dashboard specifies otherwise.
- Prepare the preview: Enter the title and audience settings. Disable automatic publishing, then click Start Streaming in OBS.
- Check and publish: Wait for the picture in Live Producer and check its connection status. Use a test-broadcast option if available. Otherwise, review the preview and click Go live when ready.
- Finish: End the broadcast in Facebook and stop streaming in OBS.
If Facebook blocks the broadcast setup, resolve the account or Page eligibility message before changing OBS settings.
Fix Common OBS Streaming Problems
Open View > Stats during a test or broadcast. Counters that keep increasing after startup can help distinguish a connection problem from a computer-performance problem.
| Problem | First Action |
|---|---|
| Black camera picture | Close other applications using the camera. Double-click the OBS camera source, select the correct device, and restore its default resolution. |
| No microphone sound | Check the microphone's mute switch. Select it by name in Settings > Audio, unmute its mixer channel, and speak to check the meter. |
| Echo or doubled voice | Mute the platform playback tab and wear headphones. Keep one microphone input active. Set microphone monitoring to Monitor Off in Advanced Audio Properties. |
| Network dropped frames | Pause other uploads and use Ethernet. If frames keep dropping, stop the stream, reduce video bitrate by 20%, and test again. Persistent problems need a check of upload stability and the route to the streaming server. |
| Rendering lag | If gaming, cap the game's FPS at 60 for the next test. Lower game graphics settings and remove animated browser sources to free GPU capacity. |
| Encoding lag | Lower the output to 1280 × 720 at 30 FPS, or 720 × 1280 for portrait. If already using those settings, choose a faster encoder preset and retest. |
| OBS cannot connect | Recheck the server URL and stream key, or reconnect the platform account. A reset stream key must also be updated in OBS. |
Change one setting at a time so you can identify which adjustment resolves the problem.
FAQs About Streaming with OBS
Can you stream with just OBS?
Yes. OBS can be your only broadcasting application when your platform accepts a direct OBS connection. You still need a computer, internet access, and an eligible platform account. A webcam and capture card are optional for screen-only content. Some TikTok accounts need an additional approved TikTok desktop tool instead of direct OBS streaming.
Is OBS free?
Yes. OBS Studio is free to download and use, with no subscription fee or built-in watermark. Paid overlays and third-party services are optional.
Can OBS record without streaming?
Yes. Click Start Recording instead of Start Streaming. The video is saved on your computer without being broadcast.
Can OBS stream to several platforms at once?
The standard OBS streaming setup sends to one destination. Multistreaming requires an additional service or a suitable plugin. Confirm that a single-platform broadcast works before adding more destinations.
Why does OBS close unexpectedly?
A crash is different from ordinary stream lag. Reopen OBS and select Help > Log Files > Upload Last Log File to retrieve the previous session's log. If the problem started after installing a plugin, update or remove it and test again. Include the log when requesting support.
Conclusion
Build one scene, check its picture and sound with a short recording, then complete the setup for your chosen platform. Once the first broadcast runs reliably, add extra scenes, overlays, or higher-quality output one change at a time.