How to Use OBS Virtual Camera [Detailed Steps]
Traditional video calls and virtual classroom sessions often lack visual appeal. Presenters, nowadays, are stuck with boring backgrounds and struggle to capture their audience's attention. This is where OBS Studio's virtual camera comes in. When you use a virtual camera, you can take on the role of director, creating a distinctive and engaging video that makes you stand out.
So, are you prepared to let your imagination run wild and elevate your presentations and video calls? In this article, we will talk about all things, how to use an OBS virtual camera, and cover all the requirements for Zoom, Mac, Windows, and Discord.
Part 1: What is an OBS Virtual Camera?
The OBS Virtual Camera is a built-in feature in OBS Studio that allows you to output your OBS scene as a webcam in apps like Zoom, Discord, and Google Meet.
With this feature, you can use your OBS scenes, including images, videos, screen captures, and overlays, as your video source instead of a standard webcam. This makes it possible to create more engaging and professional-looking video calls, presentations, and live streams.
For example, you can share your screen, play media, or display customized layouts during a video call instead of showing a traditional camera feed. It also allows you to enhance your webcam with filters, transitions, and visual effects.
Key Features of OBS Virtual Camera:
- Output your OBS scene as a webcam in apps like Zoom or Discord
- Combine multiple sources (camera, screen, media files)
- Add real-time overlays, transitions, and filters
- Seamless integration with video conferencing and streaming platforms
Use Cases of OBS Virtual Camera:
- Professional video meetings and presentations (Zoom, Discord, Google Meet, and more)
- Live streaming setups with custom layouts
- Online teaching and webinars
- Content creation and recording
Part 2: How to Set Up and Use OBS Virtual Camera
To use the OBS Virtual Camera in OBS Studio, you need to first create a scene with your desired sources, then enable the virtual camera output. Follow the steps below:
Step 1: Install or Update OBS Studio
Make sure you have the latest version of OBS Studio installed on your computer.
You can download it from the official website or update it via Help > Check for Updates.
Step 2: Create a Scene and Add Sources
Open OBS Studio and create a new scene. Then add the sources you want to use, such as:
- Video Capture Device (your webcam)
- Display Capture (your screen)
- Images, videos, or text overlays
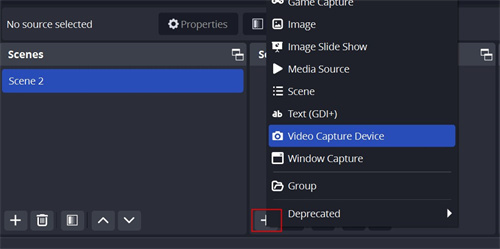
You can combine multiple sources to create a fully customized video layout.
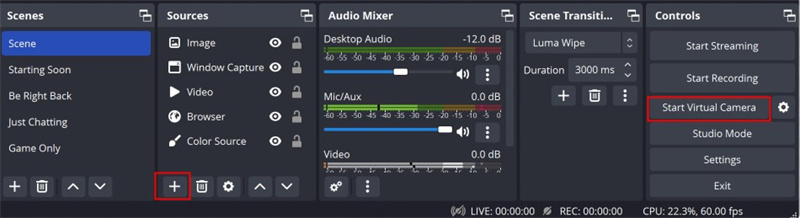
Step 3: Start the Virtual Camera
Once your scene is ready, go to the Controls panel in the bottom-right corner and click Start Virtual Camera.
This enables OBS to output your scene as a virtual webcam.
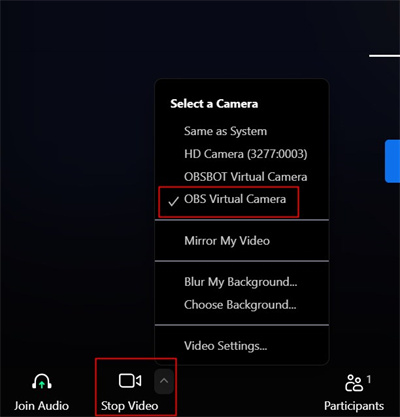
Step 4: Select OBS Virtual Camera in Your App
Open the app you want to use (such as Zoom, Discord, or Google Meet), and go to the camera settings.
Select "OBS Virtual Camera" from the list of available camera devices.
Step 5: Use Your Customized Video Feed
After selecting the virtual camera, your OBS scene will be used as your webcam input.
Anything you can add in OBS, overlays, text, transitions, or multiple sources, they will appear in your video feed in real time.
The Best Webcam for OBS High-Quality Videos: OBSBOT Tiny 3 Lite 4k PTZ Webcam
When using the OBS Virtual Camera for livestreams, broadcasts, or meetings, a high-quality webcam with clear audio is essential. The OBSBOT Tiny 3 Lite delivers sharp video and natural, clear sound, helping you communicate effectively. Whether for streaming, webinars, or content creation, it helps you stay focused and get the most out of the OBS Virtual Camera.
Here's what enhances your videos:
- Voice Loctor & Voice Tracking: Tiny 3 Lite automatically detects your voice and follows your movements, keeping you centered and hands-free for seamless streaming or video calls.
- Intelligent Directional Mic System: Combines one omnidirectional and two directional MEMS microphones to capture clear, natural audio and reduce background noise.
- 4K Video for Professional Streams: Equipped with a 1/1.2" CMOS sensor, OBSBOT Tiny 3 Lite delivers 4k at 30fps and 1080p at 120fps, providing sharp, vibrant, and fluid visuals.
- AI Tracking 2.0: Keeps you perfectly framed using human, object, and zone tracking, with dynamic auto zoom for professional, hands-free video during streams, calls, or presentations.
- Compact Size, Big Flexibility: Its sleek and lightweight design makes it easy to position on a desktop, laptop, or tripod, letting you adapt your setup perfectly for OBS recordings or live-streaming environments.
Part 3: How to Set Up an OBS Virtual Camera for Zoom
Step 1: Update or Download OBS Studio
- You can either upgrade OBS Studio to the most recent version on your device or download it from the official website.
Step 2: Launch and Set Up the Software
- Launch OBS and begin adding the scenes and sources you want to see during your Zoom call.
Step 3: Convene a Zoom Conference
- After you've customized your OBS, launch a Zoom conference and use the virtual camera to set up your webcam feed. Go to Zoom's Settings and select Video to accomplish this. Choose the OBS virtual camera from the drop-down selection for the camera.
Step 4: Activate OBS Virtual Camera
- To activate the virtual camera and sync with Zoom, you will now need to return to OBS and click Start Virtual Camera in the lower right corner.
Part 4: How to Set Up an OBS Virtual Camera for Discord
Step 1: Download and Install OBS Studio
- Download the most recent version of OBS Studio from its official website and follow the installation instructions.
Step 2: Configure the Digital Camera
- Within the box, click the Plus symbol. Choose Display Capture or Video Capture Device from the list of options, then pick your webcam. Lastly, select "Start Virtual Camera."
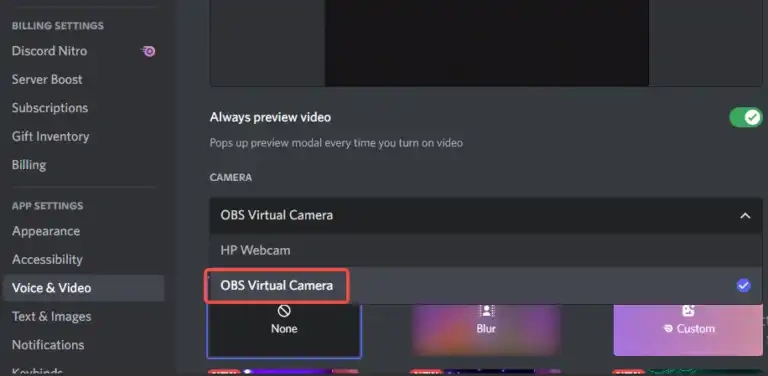
Step 3: Modify the Discord Configuration
- Get the User Settings open. Tap on the Voice & Video button in the App Settings section. Under the video preview, select Camera List by swiping down to the video settings. Choose OBS virtual camera after that. Your virtual camera feed ought to now be visible in the video preview.
Part 5: OBS Virtual Camera Not Working Solutions
You can try one of the following fixes if your OBS virtual camera is not working properly or isn't showing up at all:
- Restart OBS: Restarting the software or your system is the easiest and most obvious fix. Antivirus software has the ability to block video feeds, so you might also try disabling it.
- Adjust the Video Configuration: You can alter the video format, frame rate, and resolution under the Output tab of the Settings window.
- Reinstall or Update the Camera Driver: Download the most recent webcam driver version from the official website OBS virtual camera.
- Examine the Latest OBS Upgrades: Click "Check for Updates" under the Help tab in the menu bar. Click Update Now to install the update if it is available.
FAQs About OBS Virtual Camera
1. How do I use virtual camera with OBS?
With an OBS virtual camera, you can send the OBS scene to other apps that work with the webcam input. You only have to use the "start virtual camera" features in the OBS controls. It works well on Linux, Windows, and macOS once you are done setting up the scenes and sources. This means you can share multiple video sources and overlays rather than a simple webcam.
2. Why can't I start a virtual camera on OBS?
You may not be able to start the OBS virtual camera in OBS Studio due to an outdated version, camera being used by another app, missing permissions, or installation issues. Restarting or updating OBS usually fixes it.
3. Is OBS virtual camera free?
Yes, the OBS Virtual Camera feature is included at no cost with the open-source OBS Studio download and doesn't require a paid plan. It's available across platforms like Windows and macOS once you install the latest OBS build. The only cost is any hardware you choose for your setup, such as a webcam or a Tail 2 for all-in-one video capture.
4. What is the point of OBS virtual camera?
The OBS virtual camera in OBS Studio lets you use your customized OBS scene as a webcam in other apps like Zoom, Discord, or Google Meet. Its purpose is to replace a standard camera feed with a fully controlled video source, so you can add overlays, screen content, multiple inputs, and effects, and have them appear as a real-time webcam feed in any application.
Wrapping Up
So, the article must have equipped you with the knowledge to unlock the full potential of OBS Studio's Virtual Camera and how to use an OBS virtual camera. By replacing your standard webcam feed with customized content, you can transform your video calls and presentations into engaging experiences.
But you must remember that the possibilities are endless. Experiment with different scenes, sources, and settings to tailor your virtual camera output to your specific needs. From captivating presentations to interactive streams, the OBS virtual camera empowers you to take control and elevate your video communication.


