How to Use OBS: Beginner's Guide 2026
Live streaming is an ever-growing career nowadays. If you plan to start your live-streaming career, then Open Broadcasting Software Studio is the way to go. It's a professional and robust solution to enjoy live-streaming in high quality. However, you will need some guidance to operate it properly.
So here, we will share how to use OBS efficiently and live stream your content seamlessly. In this article, you will learn to create scenes in OBS, add audio/video sources, and much more.
Part 1: A Quick Overview of OBS Studio
OBS Studio or Open Broadcasting Software is an open source program for streaming live content and recording endless videos.
With this tool, you can stream to multiple platforms such as YouTube, Twitter, Discord, and so on. It has emerged as a favorite platform for gamers and content creators when it comes to living streaming.
Being a versatile software, it is packed with plenty of features like an intuitive audio mixer, unlimited scene setup, etc. In addition, this tool is cross-platform so you can download it on Windows, Linux, and Mac operating systems easily.
Once you learn how to use obs software on your system, there's a lot that you can do with it. Let's move on to the possibilities of OBS and its application.
Part 2: How to Create a Scene in OBS
Scenes in OBS are important as they serve the purpose of visual templates and showing a plethora of elements on the screen. It includes a blend of video and audio layers with every layer containing an input.
When you open the OBS for the first time, the first screen you notice will have an empty scene at the bottom left of the screen box. To create a scene in OBS, please follow these steps:
- Run OBS on your system and navigate to the screen box.
- There, you can click on the "+" sign located at the bottom. Next, you may have to provide a name to the screen.
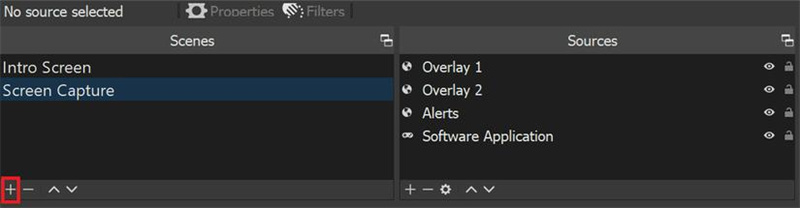
- After setting up the scene, you have to add the source for adding both alerts and overlays.
Part 3: How to Add Video/Audio Sources on OBS Studio
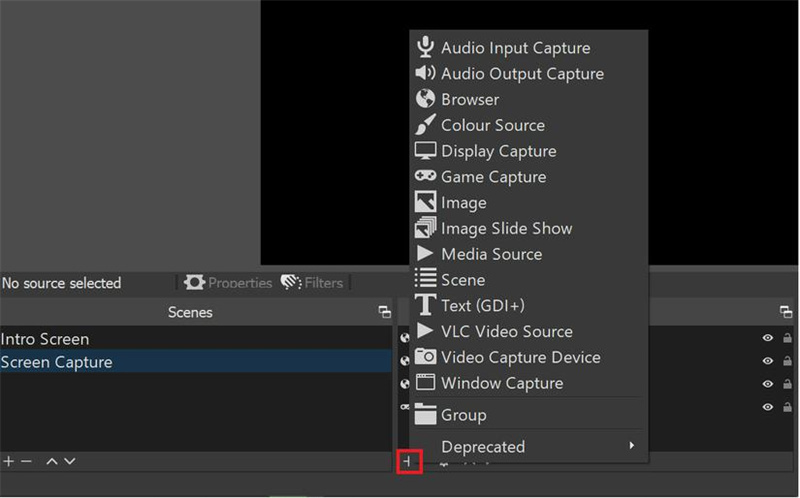
Now that you have the scene ready and all the equipment connected, it's time to add the audio and video sources.
- Launch OBS on your system and from the main window, right-click on the "Sources" box and choose "Add" from the dropdown menu.
- Select the "Video Capture Device" or "Game capture" option as per the capture card model you have and click on "OK".
- Now, add a name for the new source like "Capture Card Audio" and click "OK".
Bonus: The Best Streaming Camera for OBS
Are you looking for an extraordinary cam to do the job? Meet the OBSBOT Tail Air Streaming Camera. It's revolutionizing the way you can create content. This software is laden with robust AI capabilities and provides impressive support with a plethora of features.
With connectivity options ranging from HDMI, Wi-Fi, Ethernet, USB, and more, you can set up streaming pretty easily. Moreover, it also offers AI director grid, auto-tracking, NDI streaming, and a lot more features in hand.
Part 4: What Does Each Source Mean
In OBS, source refers to an element that can be added to your scene. It comprises video files, audio files, images, text, etc. You can add, remove, or modify it in your way to design a customized layout either for live streaming or recording.
- Audio Input Capture: captures audio from various input devices, especially microphone
- Display Capture: captures a screen or the complete window
- Image: helps in adding an image file to a scene
- Media Source: can be used to add a video or audio file
- Text: used for adding text to the scene in a customized manner
- Video Capture Device: captures video from a webcam or any other input device
Part 5: How to Arrange and Manage Layers Effectively
A layer system enables the streaming of multiple sources of videos at once. Whenever you add a video source, it’s included above the layer that contains images and videos. Thus, they remain placed as stacks. For instance, if you want to stream your game with the webcam turned on, just put the Video Capture Device source first and then the Game Capture of your game.
Part 6: How to Locking/Unlocking Sources
If while streaming, you wish to lock or unlock sources, OBS provides you a way to do so using right click/lock option. It is represented next in the sources as the lock sign. You simply have to toggle it to turn on or off.
FAQs About How to Use OBS
Is OBS Good for Beginners?
Yes, OBS is great for beginners despite its professional features. Although it might seem complex at first, OBS Studio has an intuitive interface with simple scene creation and source management. The software is free, open-source, and offers helpful features like unlimited scenes and an audio mixer. Once you get familiar with basic functions like adding video sources and creating scenes, OBS becomes easy to use and remains a top choice for streaming.
2. Is OBS Free to Use?
Yes, OBS Studio is completely free. It’s an open-source program available for Windows, Linux, and macOS without any hidden fees or subscriptions. OBS offers professional-grade streaming and recording features at no cost, making it accessible to both beginners and experienced content creators. You can stream to platforms like YouTube, Twitch, and Discord completely free of charge.
3. How to Use OBS to Record Video?
Using OBS to record video is simple. Start by creating a scene by clicking the "+" in the Scenes box and naming it. Add video sources by right-clicking the Sources box, selecting "Add," then choosing "Video Capture Device" for webcams or "Game Capture" for gameplay. The OBSBOT Tail Air integrates seamlessly with OBS through HDMI, USB, or Ethernet, offering AI tracking and NDI streaming features for enhanced video capture.
4. Is OBS Studio Safe?
Yes, OBS Studio is safe to download and use. It’s a trusted, legitimate open-source software used by millions of content creators and streamers. Always download OBS from the official website (obsproject.com) to ensure you get the authentic, secure version. The software is free from malware or bundled unwanted programs. Its open-source nature allows the community to continuously verify its security and quality.
5. Does OBS Record in 4K?
Yes, OBS Studio supports 4K recording and streaming. You can set OBS to record in 4K resolution (3840x2160) via the Settings menu under Video. Set both the Base and Output resolutions to 4K for optimal quality. When paired with 4K cameras like the OBSBOT Tail Air, which offers AI auto-tracking and NDI streaming, OBS delivers ultra-high-definition content for professional-quality recordings and live streams.
Final Words
Now, as you know the myriad of possibilities offered by the OBS Studio, don't forget to use it for your content creation purpose. At first, it may seem a little difficult to use but once you get familiar, OBS will become your preferred choice for live streaming. Download it today and start learning so you can live stream professionally like others. And if you are looking for a good live-streaming camera too, then the OBSBOT Tail Air camera is like a cherry on the cake. Use their combination to create live streaming in your way.


