How to Stream on Twitch Using OBS [Qick Guide]
Twitch is a video streaming platform. It provides a fun and social way to watch people play games. It is one of the most popular streaming platforms among game lovers these days. However, many users are still finding difficulties in streaming on Twitch. If you are among them, then this blog will be helpful for you.
In this whole article, we will learn how to use OBS to stream a game on Twitch, along with some bonus tips. So, let's begin learning to enhance the gaming and streaming experience.
The Best Camera for Twitch Streaming: OBSBOT Meet 2 4K Webcam
When you stream on Twitch, you will need the best webcam. So, let's have a little discussion on it. The best webcam available for Twitch streaming is OBSBOT Meet 2. It comes with powerful AI technology and a superior image system to provide an excellent streaming experience. OBSBOT Meet 2 is the tiniest 4K AI webcam, which is suitable for diverse setup scenarios.
Features of OBSBOT Meet 2:
-
1/2" Coms for perfect performance in low light conditions
-
4k 30fps and 1080p 60fps video resolution is best for your games
-
Built-in dual omnidirectional microphones for a clear voice
-
AI auto-framing so you're always centered
How to Stream on Twitch Using OBS
Without talking much, let's directly dive into learn the detailed steps one by one to learn how to use Twitch streaming software with OBS:
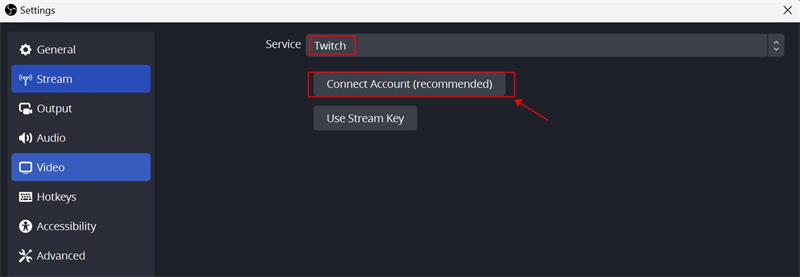
Step 1: Place a connection between OBS Studio and Twitch. To do this, you'll need your Twitch stream key
- Open OBS Studio, then click on "Settings" in the bottom right corner. You can also tap on the "File" and then "Settings" options from the drop-down menu.
- Choose "Stream" given on the left of the "Settings" panel. From the left-hand side, choose "Twitch" as your service. Tap on the "Connect Account" option, put in the Twitch login credentials, and then hit the "Apply" button.
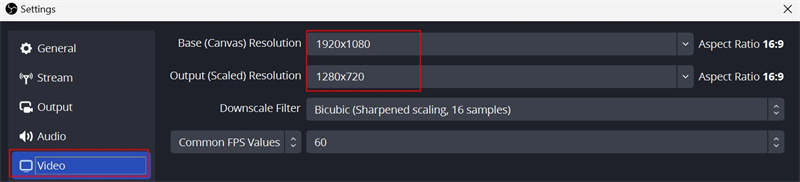
Step 2: Configure OBS Studio
- Open OBS Studio and hit the "Settings" button. Now, from the left-hand side, choose "Video". After setting the "Base" and "Output" resolutions, hit the "Apply" button.
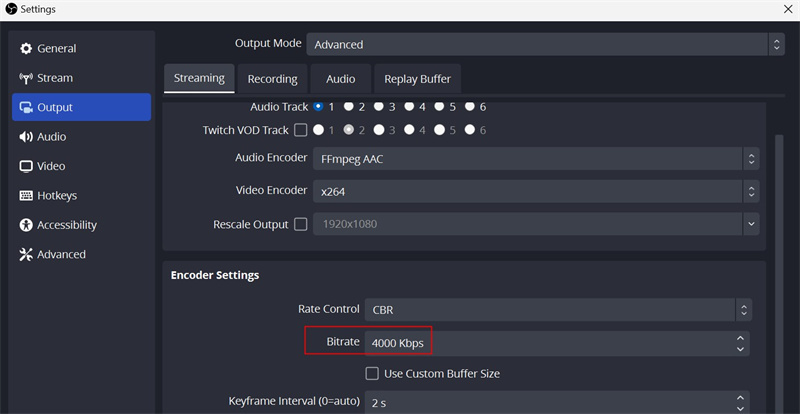
- In the next step, choose the "Output" button from the left-hand menu. After that, you need to choose the encoder and the "Video Bitrate". Here is the full guide for the best Twitch bitrate for streaming.
| 1080p @ 60 fps | 6,000 Kbps |
| 1080p @ 30 fps | 5,000 Kbps |
| 720p @ 60 fps | 5,000 Kbps |
| 720p @ 30 fps | 3,500 Kbps |
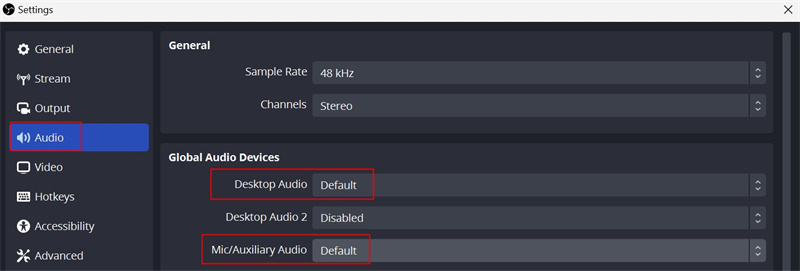
- Select "Audio" from the left-hand menu, navigate through "Global Audio Devices" and choose the right source for desktop audio. After choosing the right source for Mic/Auxiliary Audio, hit the "Apply" button.
Here are more details about the best OBS setting for streaming.
Step 3: Creating Scene
- Tap on the "Plus" icon given in the bottom left corner, under "Scenes". Click on "OK" after typing a name. Then, click on the "Plus" icon given under "Sources".
- A pop-up menu will appear, select "Game Capture" from there. Click on "OK" after typing a name.
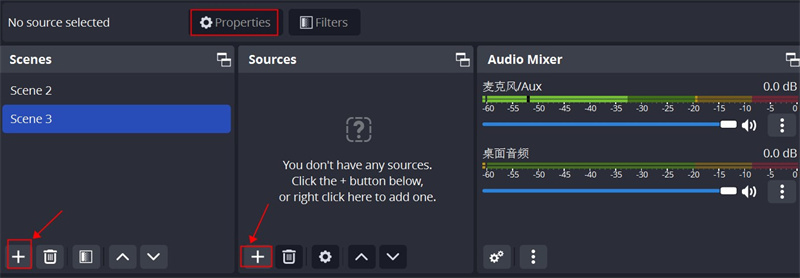
- Open the "Properties Panel" and choose a mode as well as any other element as per the requirement. After that, hit the "OK" button.
- Click on the "Plus" icon under the "Sources" menu. From the pop-up menu that appears, click on "Video Capture Device". Click on "OK" after entering a name for the webcam.
- Open the "Properties Panel" and choose the correct device. Then click on "OK" after changing other settings as per the requirement.
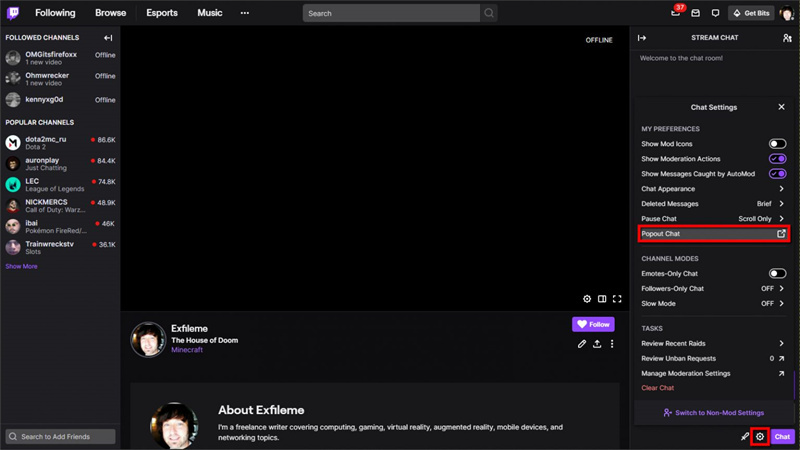
Step 4: Add Twitch Chat
- Enter credentials to log in to Twitch. Then hit the profile icon and from the drop-down menu, select channel. Click on "Chat" and from the bottom right corner, tap on the "Cog" icon.
- On the pop-up menu that appears, click on the "Popout" chat and copy the URL. Tap on the "View" in OBS Studio.
- Now, continuously click on "Docks" and "Custom Browser Docks". Lastly, click on "Apply" after entering the name and pasting the URL.
 Step 5: Start your stream
- Begin the game and hit the "Start Streaming" button in the OBS Studio app. End your session as well as the game by hitting the "Stop Streaming" button whenever you wish to.
That's it! These were the complete steps on how to set up OBS for Twitch.
FAQs About Twitch With OBS
1. Can I Use OBS to Stream on Twitch?
Yes, you can absolutely use OBS (Open Broadcaster Software) to stream on Twitch. OBS Studio is one of the most popular and widely used streaming software options for Twitch. Simply connect your Twitch account to OBS by entering your stream key in the settings, configure your video and audio preferences, create scenes with game capture and webcam sources, and click "Start Streaming" to begin broadcasting live.
2. How Do I Put My Twitch on OBS?
Connecting Twitch to OBS is simple. Open OBS Studio, click "Settings," select "Stream" from the left menu, choose "Twitch" as your service, and click "Connect Account." Enter your Twitch login credentials and apply the settings. Alternatively, you can manually paste your Twitch stream key into OBS. Then, configure video resolution, bitrate, audio sources, and create scenes before starting your stream.
3. Do Streamers Still Use OBS?
Yes, OBS remains one of the most popular streaming software choices among Twitch streamers. Its free, open-source nature, powerful customization options, and compatibility with various platforms make it a top choice for both beginners and professionals. Paired with quality equipment like the OBSBOT Meet 2 4K webcam featuring AI auto-framing and dual omnidirectional microphones, OBS delivers exceptional streaming experiences.
4. Is OBS the Best for Twitch?
While there are alternatives, OBS is widely considered one of the best for Twitch streaming. It offers comprehensive features like scene customization, multiple source integration, high-quality encoding, and full control over stream settings—all for free. Alternatives like Streamlabs OBS and XSplit exist, but OBS Studio remains the gold standard due to its reliability, flexibility, and strong community support for troubleshooting.
5. What Bitrate Is 1080p 60fps on Twitch?
The recommended bitrate for 1080p at 60fps on Twitch is 6,000 Kbps, ensuring smooth, high-quality streaming without buffering. For 1080p at 30fps, use 5,000 Kbps; for 720p at 60fps, use 5,000 Kbps; and for 720p at 30fps, use 3,500 Kbps. Using the OBSBOT Meet 2 webcam with 4K 30fps and 1080p 60fps capabilities ensures optimal video quality when paired with proper bitrate settings.
Final Words
So, here we have discussed the detailed procedure to stream on how to set up OBS for streaming on Twitch. After completely consuming this guide, you will be able to enhance your gaming experience even more. Furthermore, as a bonus tip, we have also shared the best camera available for Twitch streaming. OBSBOT Tail Air will even make your streaming on Twitch even more successful. It is the most recommended camera for streaming purposes. So, whenever you are going to stream on Twitch and are having difficulties, follow the steps mentioned in this blog above. Also, do not forget to give OBSBOT Tail Air a try.


