How to Use OBS for YouTube: A Beginner's Guide

If you are a YouTuber and seeking just the right tool to connect and stream live on YouTube, OBS is what you need. OBS Studio is the most straightforward tool, whether you're streaming your screen, webinars, or gameplay to YouTube. Whatever your motivations are, in this article, we have demonstrated a detailed walkthrough on how to use the OBS for YouTube and start sharing your content with the target audience.
Part 1: How to Use OBS for YouTube Live Streaming
Without much talking, let’s get to understand the detailed procedure on how to use OBS with YouTube live streaming. Here’s what you need to do.
Step 1: Sign in to your YouTube account and go to “YouTube Studio” with the help of your profile icon in the top right corner.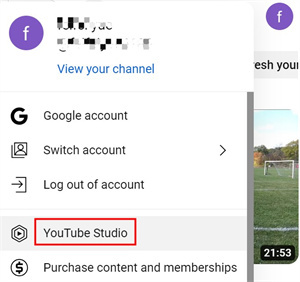
Step 2: Once done, you will be on your YouTube Studio’s “Creator Dashboard”. Now, from the right top, you’ll see “Create”, click it and choose“Go Live”.
Step 3: If you didn't apply for streaming permission before, complete the phone number verification process and add your phone. Soon, a verification code ought to arrive. To get your account approved and move on to the following step, though, it could take up to 24 hours.
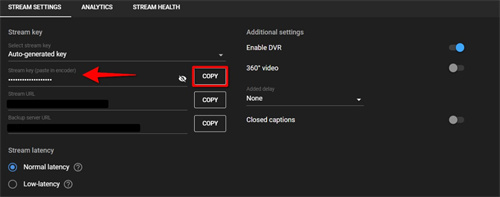
Step 4: Once you have the permission, press on the “Stream” tab and put all the necessary details into it. Click “Create Stream” and leave the rest of the menu as is.
Step 5: You can discover your specific 16-character stream key under “Stream Settings”. Either manually type it in OBS or copy it to the clipboard.
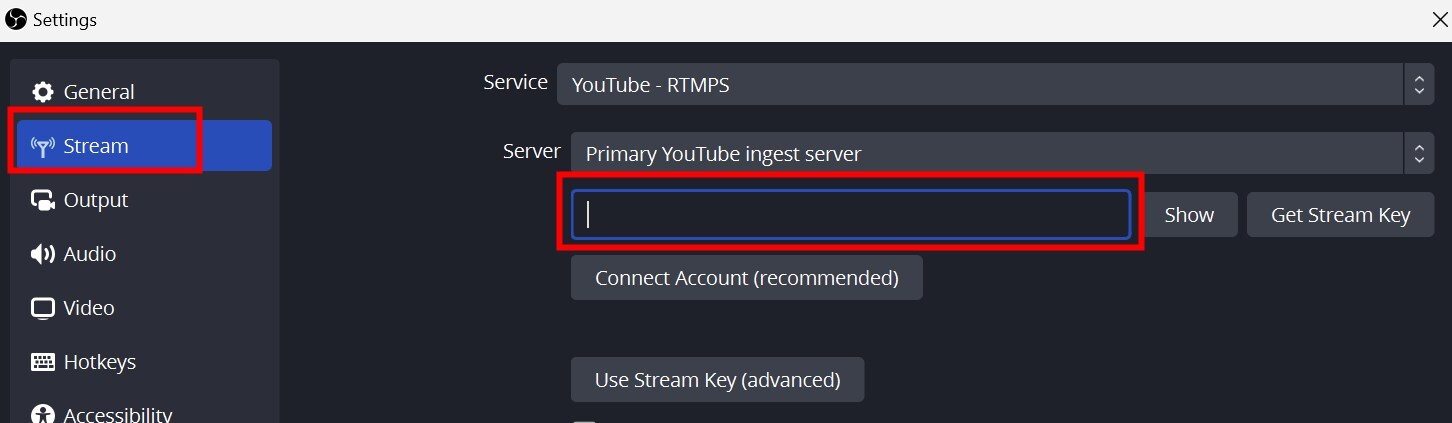
Step 6: Lastly, you need to launch OBS Studio now and then get into the "Settings" followed by "Stream" settings and paste the "Stream key" after selecting "YouTube" as a service. Once done, you just need to adjust the OBS streaming software settings (including video/audio settings and optional green screen filter) as per your preference for optimal video quality and bitrate, and then start streaming to YouTube using OBS Studio.
Or, you can simply read through the next section of the article, as we have also discussed the optimal OBS settings for YouTube Streaming.
Bonus: Best Camera for OBS YouTube Streaming
With several contributing factors, OBSBOT Tail Air Streaming Camera is among the best cameras for OBS YouTube Streaming. This AI camera offers exceptional software support with one-click streaming and programmable image settings during live streams. Its AI features include AI Director Grid, auto-tracking for objects or humans, NDI streaming, and smart gesture control. This camera has a range of connectivity options, including micro HDMI, Wi-Fi, Ethernet, USB, and more. You can easily add it to your streaming setup. Hence, the OBSBOT Tail Air truly excels in adaptability and performance.
Part 2: Best OBS Settings for YouTube Streaming
Here in this section, we are going to help you with configuring the OBS settings for YouTube streaming that will deliver optimal quality video streaming if done right.
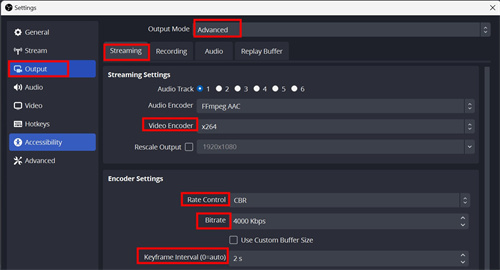
Step 1: Select “Output” under “Settings”, change the Output Mode to “Advanced”, and then:
- Depending on the graphics card of your system, you can choose either the x264 encoder or the NVENC encoder.
- Set the Rate Control to CBR.
- Bitrate to 4000 if you are streaming at 30 FPS or to 6000 if you are streaming at 60FPS
- Lastly, set the Keyframe Interval to 2
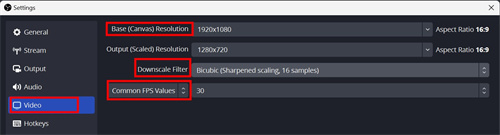
Step 2: Then, under the “Video” tab, set the “Base (Canvas) Resolution” settings same as your Display’s resolution and the “Output (Scaled) Resolution” to “1920 x 1080”.
Now, since there is no scaling happening in this scenario as both Base (Canvas) Resolution is the same as Output (Scaled) Resolution, set the “Downscale Filter” to “Bilinear” and “Common FPS Values” to “30”.
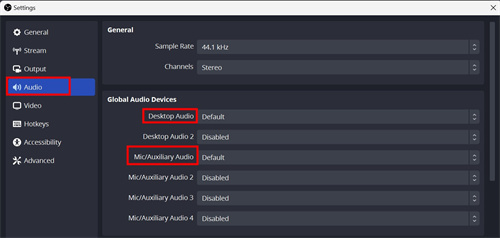
Step 3: Now, get into the Audio tab and turn on “Desktop Audio” for in-game sounds, whereas, turn on the Mic/Auxiliary Audio to converse with your audience. To move ahead, click “OK” and “Apply.”
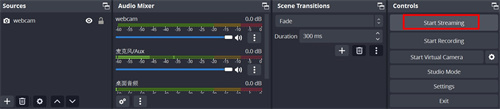
Step 4: Once done, add items by clicking the “+” symbol next to “Sources”. Pick any option, such as "game capture" and add a webcam if required. You can also add titles and subtitles in your stream to make your video more informative and professional.
Step 5: Once you are satisfied with all the settings, hit the “Start Streaming” button to start sharing content live.
Part 3: How to Use OBS for YouTube Video Recording
Mostly, the content producers capture videos for YouTube using OBS (Open Broadcaster Software). You may record your screen, webcam, and audio with the free and open-source OBS program. Here is a step-by-step tutorial on using OBS to record videos for YouTube:
Step 1: Before you hit the Start Streaming button in the last step above, you need to make a few more changes in the settings if you wish to record the videos via OBS too. Get into “Settings” followed by “Output” and then under the “Recording” tab, you’ll find the output path of your recorded file.
- Ensure the “Recording Format” here is “MP4” as it is the best output quality format.
- Set “Video Encoder” to “x264” or “NVIDIA NVENC” as per your hardware configuration.
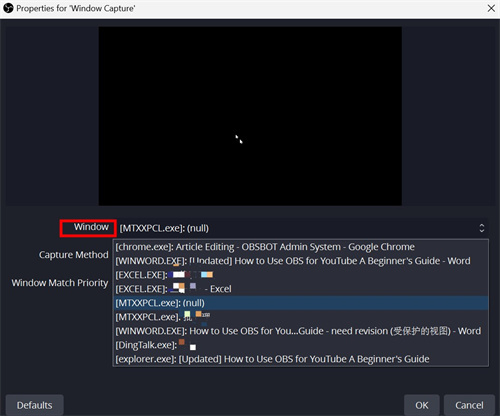
Step 2: Now, you need to hit the “+” icon to add the source, followed by selecting “Window Capture”. Next, name the source and hit “OK”. You will now see another dialog box. Hit the Window drop-down menu and then select the windows (running already) that you wish to record. Hit “OK” and you’re done. The live preview of your recording will be visible in the center of the OBS Studio screen.
Step 3: You can add more sources to the recording, for instance, the Webcam to project a PIP effect, in the same way as we did in the last step above.
Step 4: In the bottom right corner, you can access the “Controls”, and tap on “Start Recording” to get started and "Stop Recording” once done.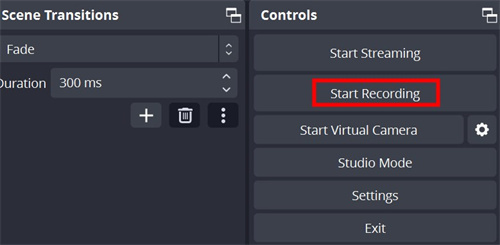
Step 5: After recording, all the files are saved in the “Output” directory designated in OBS's “Settings”.
Part 4: Best OBS Settings for YouTube Recording
If you want to record a YouTube video of the highest quality, you must configure your OBS (Open Broadcaster Software) parameters correctly. Although we have already discussed them in the previous sections, for your convenience, here’s a quick snapshot of the optimum OBS settings for YouTube video recording:
- Video Resolution: For YouTube, 60 frames per second and a 1080p resolution will do the needful.
Note: Choosing the higher video resolutions requires more processing power.
- Bitrate: Adjust it to 4000 if streaming/recording at 30 FPS and to 6000 if streaming/recording at 60 FPS.
- Video Encoder: Set it to x264 encoder if you don’t have an external graphics card. However, the x264 encoder provides an outstanding balance of speed and quality if your hardware is equipped with external graphics, opt for its video encoder.
- Audio Settings: Choose the AAC codec and set the bitrate for audio encoding to 160 kbps.
- Recording Format: Most video editing tools are compatible with MP4, as it is the most used recording format.
- Record to an SSD: Recording to an SSD (Solid-State Drive) is quicker and more dependable than recording to a hard drive.
FAQs About OBS for YouTube
Can OBS Be Used for YouTube?
Yes, OBS Studio is fully compatible with YouTube for both live streaming and video recording. You can link OBS to your YouTube account by entering your stream key in the settings. OBS lets you stream gameplay, tutorials, webinars, or any content directly to your YouTube channel. It also supports recording videos locally that you can upload to YouTube later, making it a versatile tool for creators.
2. Do You Need 1000 Subscribers to Go Live on YouTube?
Not anymore. While YouTube used to require 1000 subscribers for mobile live streaming, you can stream on desktop via OBS Studio without meeting the subscriber threshold. However, you'll need to complete phone number verification and wait up to 24 hours for account approval before your first live stream.
3. Is OBS Free to Use?
Yes, OBS Studio is completely free and open-source, with no hidden fees or subscription costs. You can access all its features, including live streaming, video recording, scene transitions, and audio mixing, without paying anything. OBS doesn't add watermarks to your videos, unlike some paid software. It supports various encoders like x264 and NVIDIA NVENC, making it accessible for various hardware configurations.
4. How to Go Live on YouTube Using OBS?
To go live on YouTube using OBS, sign into YouTube Studio and select "Go Live" from the Create menu. After completing phone verification, go to the Stream tab and copy your 16-character stream key. Open OBS, go to Settings, select Stream, choose YouTube as the service, and paste the stream key. Adjust your video settings, set up the OBSBOT Tail Air camera if you're using one, then click "Start Streaming."
5. What Is the Best Streaming Software for YouTube?
While there isn't a single best option, OBS Studio is widely regarded as the top choice for YouTube streaming due to its free, open-source nature and extensive customization. It offers advanced features like scene switching, multiple audio sources, and various encoder support. For enhanced streaming, pair OBS with high-quality equipment like the OBSBOT Tail Air Camera, which features AI-powered tracking and easy streaming integration.
Conclusion
Whether you want to stream your favorite games, broadcast your tutorials, or upload any video of your choice, OBS Studio is the one-stop solution for the community at large. And therefore, Open Broadcaster Software (OBS) is certainly the most sought-after tool. With the above-detailed tutorials and the information we discussed, anyone can use OBS for streaming and recording YouTube videos effortlessly.


