How to Fix Zoom Camera Not Working (12 Workable Methods)
Zoom is used by most people for work meetings or online lectures. So, when Zoom stops working, it can be frustrating. A camera not working on a Zoom call can make you feel frustrated and stuck, especially when you have to show your face during the meeting. The good thing is that you can easily fix Zoom camera not working if you follow some simple steps. With this article, we are sharing 12 most effective methods to fix the Zoom camera.
Part 1: Why Camera/Webcam Not Working on Zoom?
Various underlying factors might cause the problem of the camera not working on Zoom. When you experience pain, you should suspect any of the following.
- Zoom does not recognize the camera.
- Your computer setting does not allow Zoom access to the camera.
- Another app is operating in the background or using the device's camera.
- You're using an old version of the Zoom app.
- Hardware problems with your webcam or camera.
- The internet connection is unstable.
- Zoom device compatibility difficulties may show up as the Lenovo camera not working in Zoom (common in Lenovo PCs). If Zoom continues to have problems with your camera, you might want to explore some Zoom alternatives that could offer better compatibility for your device.
Bonus: Best Webcam for Zoom - OBSBOT Meet 2 4K Webcam
If Zoom repeatedly fails to detect your camera or you're using an outdated webcam, upgrading to a reliable Zoom-compatible webcam can often eliminate connection and compatibility issues. We recommend the OBSBOT Meet 2, a compact 4K webcam designed for modern video conferencing. Its plug-and-play setup, broad compatibility with Windows and macOS, and excellent image quality make it a practical choice for Zoom users who need a dependable meeting camera.
Why OBSBOT Meet 2 works well for Zoom meetings:
- True Plug-and-Play Setup: No complicated drivers or software installation required. Simply connect the webcam and Zoom can quickly recognize it as an available video source.
- 4K Resolution with Professional Image Quality: Equipped with a high-quality sensor that delivers sharp, detailed video, helping you appear clear and professional during client meetings, interviews, and team calls.
- Excellent Low-Light Performance: Maintains a brighter and cleaner image in home offices or meeting rooms where lighting conditions are less than ideal.
- Fast and Reliable Autofocus: Keeps your face sharp and in focus during meetings, even when you move closer to show documents or presentations.
- Wide Compatibility: Works seamlessly with Zoom, Microsoft Teams, Google Meet, and other popular video conferencing platforms across Windows and macOS.
Part 2: How to Fix Zoom Camera Not Working (12 Effective Methods)
Method 1: Check for Physical Obstructions (Privacy Shutters)
Many laptops from brands like Lenovo, HP, or Dell have a little shutter or slider over the camera to protect your privacy. Make sure this slider is completely open so the camera can see you. Also, check for stickers or tape that might be covering the lens. You have to remove anything blocking the view.
Method 2: Select the Correct Camera Source in the Zoom Interface
Sometimes Zoom camera not working issue happens because of the wrong camera.
1. Open Zoom and join a meeting or go to Video Settings.

2. Open the Video & effects option from the menu.
3. Look at the list of available cameras and select the one you want to use (like your built-in webcam instead of a virtual camera).

If Zoom is pointed to a virtual webcam (like OBS or Snap Camera), the real camera won't show video, hence the Zoom video not working error.
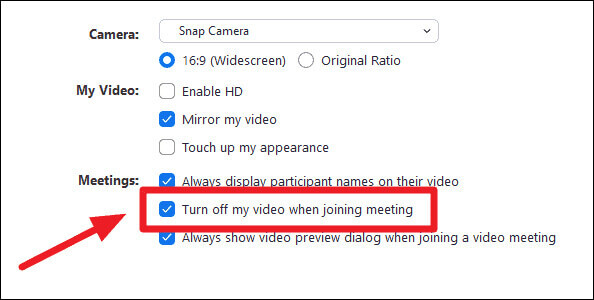
Method 3: Ensure"Turn Off Video" is Disabled When Joining
Zoom has a setting called "Turn off my video when joining a meeting." If this box is checked, your camera stays off even after you join, and you will struggle with no Zoom camera. Go to video settings and make sure this option is unchecked so your video starts automatically.
Method 4: Close Other Apps Using the Camera (Conflict Resolution)
If another app like Skype, Teams, or a camera software is using your webcam, Zoom might not be able to access it. Before starting Zoom, close other video apps or camera programs. This will free up the camera so Zoom can use it. We recommend using this easy method when Zoom is unable to detect a camera.
Method 5: Grant Camera Permissions in System Settings
Your computer might be blocking Zoom from using the camera, hence the camera not working on Zoom issue.
For Windows User:
1. Open Settings on your computer by clicking the Start menu and choosing the Settings icon.
2. Click Privacy so you can manage which apps are allowed to use your camera and other features.

3. Select Camera from the left menu to open all camera-related permission options.

4. Turn on Camera access for your device so Windows allows your webcam to work properly.

For Mac User:
1 .Click the Apple menu in the top corner of your screen and open System Preferences to change your privacy settings.
2. Go to Security & Privacy because this is where Mac controls which apps can access the camera.
3. Select the Privacy tab so you can view a list of permissions for different features, like the camera and microphone.
4. Click Camera from the list on the left to see which apps are allowed to use your webcam.
5. Check the box next to Zoom to allow it to access your camera during meetings.
For Phones and Tablets:
1. Open Settings on your phone or tablet and scroll down to Apps.
2. Tap Apps or App Management, depending on your device, to find the Zoom app settings.
3. Find and select Zoom from the list of apps so you can manage what Zoom is allowed to access.
4. Tap Permissions to view camera, microphone, and other access options for Zoom.
5. Make sure Camera permission is turned ON. This will help fix video not working on Zoom issue.
Without permission from your system, you will end up with the Zoom camera not working on a laptop issue.
Method 6: Troubleshoot "Zoom Camera Not Working" via Device Manager (Windows)
On Windows computers, you can use Device Manager to see if the camera is working and fix Zoom no camera:
1. Go to Settings, search for Device Manager, and click on it when the option pops up.

2. Find Cameras and check that your webcam is listed and enabled.

3. If the camera shows a warning sign or is disabled, right-click and enable it.
Method 7: Restart Your Computer (Clear Temporary Cache)
Restarting your device may seem simple, but it fixes a lot of issues, including Zoom unable to detect camera. When you reboot, your system clears temporary files and stops apps that might be interfering with the camera. After restarting, open Zoom again and test the camera.
Method 8: Uninstall and Reinstall the Zoom Client
If Zoom is still not working correctly with your camera, sometimes the app might be corrupted or outdated, causing the camera not working in Zoom error.
1. Delete Zoom from your computer or device.
2. Download the latest version from Zoom's official website.
3. Install it and sign in again.
This ensures you have the newest updates and a fresh start.
Method 9: Modify Zoom's Advanced Video Settings
Zoom includes advanced video settings that can help if your camera is showing a black screen or is not loading correctly. For example, switching the capturing method from Auto to Media Foundation has helped many users fix Zoom camera problems, especially when the webcam is detected, but the screen stays black.
Method 10: Check for Lenovo/HP Specific Function Keys
Some laptops (especially Lenovo or HP) have special function keys (like Fn + F8) to turn the webcam on or off. If your camera suddenly stopped showing video, press those keys to toggle the camera. Also, check any manufacturer apps like Lenovo Vantage for camera privacy settings.
Method 11: Remove Conflicting Virtual Camera Software
If you've installed software that creates a virtual camera (like OBS, ManyCam, Snap Camera), it can confuse Zoom and stop the real camera from working properly. Try uninstalling or disabling those virtual camera tools and then restarting Zoom if the Zoom not showing video issue is causing meeting issues.
Method 12: Use the Zoom Web Browser Client (Emergency Workaround)
If your installed Zoom app still won't show camera video, you can try joining your meeting through a web browser like Chrome or Edge at zoom.us. The web version often works even when the app has problems, and this is a great emergency way to join with your camera.
Part 3: FAQs About Fixing Zoom Camera Not Working
1. Why is my Zoom camera not working even though it works in other apps?
If your camera works in other apps but not in Zoom, it usually means Zoom doesn't have permission to use it, or another program is running in the background using your camera. Check your camera permissions in system settings, close other camera apps, and make sure Zoom is allowed to use the webcam.
2. How can I restart or refresh my Zoom camera during a meeting?
Inside a Zoom meeting, you can stop your video by clicking Stop Video and then clicking it again to restart. If that doesn't work, leave the meeting and rejoin. If your camera still doesn't work, close Zoom completely and restart the entire app or your device before trying again. This can refresh the connection between Zoom and your webcam.
3. What should I do if my camera shows a black screen on Zoom?
A black screen often happens when Zoom is detecting the camera, but cannot show video. First, make sure the correct camera is selected in the Zoom video settings. If it still shows black, close other applications, check camera privacy shutters, update your Zoom app and webcam drivers, and adjust the advanced video settings. Many times, this solves the black screen problem.
4. Does updating Zoom or my computer help fix camera issues?
Yes, keeping Zoom and your computer's operating system up to date helps fix bugs and improve compatibility with hardware like cameras. Updating the Zoom app and your system ensures that any known issues with webcams are fixed and that Zoom can communicate correctly with your camera hardware.
5. Can I test my camera before joining a Zoom meeting?
Yes, in Zoom, go to Settings and then Video Settings, and you'll see a live preview of your camera. If the preview shows your video, your camera is working. If not, follow the methods above to troubleshoot until your video appears in the preview.
Conclusion
Having camera trouble during a Zoom meeting can be stressful, but it doesn't have to ruin your day. When you understand the common reasons behind camera issues, it becomes much easier to stay calm and handle the problem. Learning how to fix Zoom camera not working also helps you become more confident with technology and online meetings. Instead of panicking next time, you'll know where to look and what to check first. With practice and patience, Zoom camera problems will feel less confusing and more manageable, helping you stay connected and prepared for any online class or meeting without interruptions.